 Introduced in iOS 16, NavigationStack is the modern replacement for the older NavigationView. While NavigationView was good for simple navigation flows, it struggled with deep linking, state restoration, and complex back stacks. Developers often found it limited and unpredictable, especially when navigating programmatically.
NavigationStack, on the other hand, brings clarity and flexibility. It uses a value-driven path to manage the navigation state, allowing full control over the stack of views — making it ideal for dynamic content, deep links, and even restoring navigation after an app relaunch.
Below are a quick comparison of NavigationView and NavigationStack.
Limitations of NavigationView:
- Only supports navigation via NavigationLink (no programmatic control)
- No built-in support for managing or binding to a navigation stack
- Unreliable behavior in complex or deeply nested navigation flows
- Poor support for deep linking or restoring navigation state
Advantages of NavigationStack
- Supports both programmatic and declarative navigation
- Uses [Hashable] or NavigationPath to fully control the navigation stack
- Predictable, clean logic — even with complex or dynamic view hierarchies
- Designed for deep linking, App Intents, and state restoration
Just a quick code recap how the NavigationView works below:
NavigationView {
    VStack {
        NavigationLink("Go to Details", destination: DetailsView())
    }
    .navigationTitle("Home")
}
So the code above shows that you must rely on NavigationLink, which you can’t push and pop programmatically. Check out our previous post about push and pop with NavigationView.
Now look at how NavigationStack works with Path Binding.
One of the biggest upgrades in NavigationStack is its ability to navigate using a bound path — either a simple array of Hashable values (like String, Int, or enums) or a more dynamic NavigationPath.
This makes it easy to control the navigation stack programmatically, push or pop views, and even handle deep linking or restoring app state.
Here’s a simple example using a String array as the navigation path:
@State private var path: [String] = []

NavigationStack(path: $path) {
    VStack {
        Button("Go to Details") {
            path.append("details")
        }
    }
    .navigationDestination(for: String.self) { value in
        if value == "details" {
            DetailsView()
        }
    }
}
On the above code:
- @State private var path: [String] — You declare a path to represent the navigation stack.
- path.append(“details”) — When the button is tapped, “details” is added to the stack.
- .navigationDestination(for: String.self) — SwiftUI knows how to interpret the value in the path and displays the corresponding view.
- This approach gives you clear, centralized control over where and how your navigation flows — no more nested NavigationLinks or awkward workarounds.
A More Complete Example: Type-Safe Navigation with Enum
Now that we’ve seen how to use a simple String path, let’s take it a step further with a more robust and scalable approach.
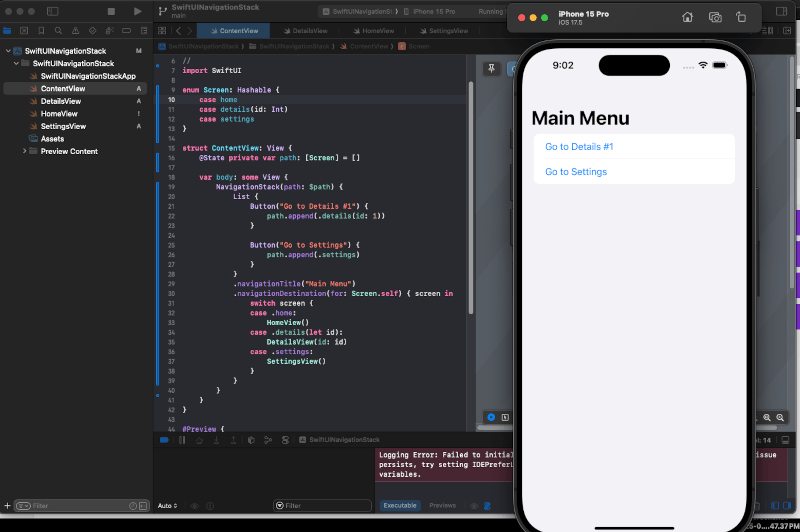
Instead of using plain strings, we define an enum that represents each possible screen in our app. This gives us type safety, clearer code, and makes it easier to manage navigation across many views (In the code example below, we have HomeView, DetailsView and SettingsView).
import SwiftUI

enum Screen: Hashable {
    case home
    case details(id: Int)
    case settings
}

struct ContentView: View {
    @State private var path: [Screen] = []

    var body: some View {
        NavigationStack(path: $path) {
            List {
                Button("Go to Details #1") {
                    path.append(.details(id: 1))
                }

                Button("Go to Settings") {
                    path.append(.settings)
                }
            }
            .navigationTitle("Main Menu")
            .navigationDestination(for: Screen.self) { screen in
                switch screen {
                case .home:
                    HomeView()
                case .details(let id):
                    DetailsView(id: id)
                case .settings:
                    SettingsView()
                }
            }
        }
    }
}
So, a quick explanation of the above code:
- Screen enum represents all the routes/screens in the app.
- @State private var path: [Screen] tracks the stack of navigation.
- Buttons push different enum cases onto the stack.
- .navigationDestination(for: Screen.self) listens for each route and renders the corresponding view using a switch.
This pattern is clean, extensible, and aligns perfectly with SwiftUI’s data-driven approach. You can easily add parameters (like an id) and still get full navigation control without losing clarity.
Conclusion
NavigationStack marks a major improvement over the old NavigationView by giving us a more powerful, flexible, and predictable way to manage navigation in SwiftUI. With support for both programmatic and declarative navigation, deep linking, and full control over the stack, it’s become the go-to navigation method since iOS 16.
In this post, we’ve covered the basics, highlighted the key differences, and walked through practical examples to help you get started.
To keep this post from getting too lengthy, we’ll save advanced topics like restoring navigation state, deep linking, and integration with App Intents (coming in iOS 18) for a follow-up post. Stay tuned!
The complete code of the above example can be found on GitHub. Happy learning!