It’s very often that we need to provide a Settings page in our apps, to let users twist with a number of settings including editing their user profile, setting various preferences and even viewing some additional reports etc.
Usually, when building a menu for the Settings page with UIKit, we’ll need to implement a UITableView with a number of sections. Of course, it’s not that straighforward to implement that in UIKit, which you’ll need to implement a number of methods of the UITableViewDataSource protocol including:
Let’s look at how easy to implement it in SwiftUI using a combination of NavigationView, List with Sections & NavigationLink.
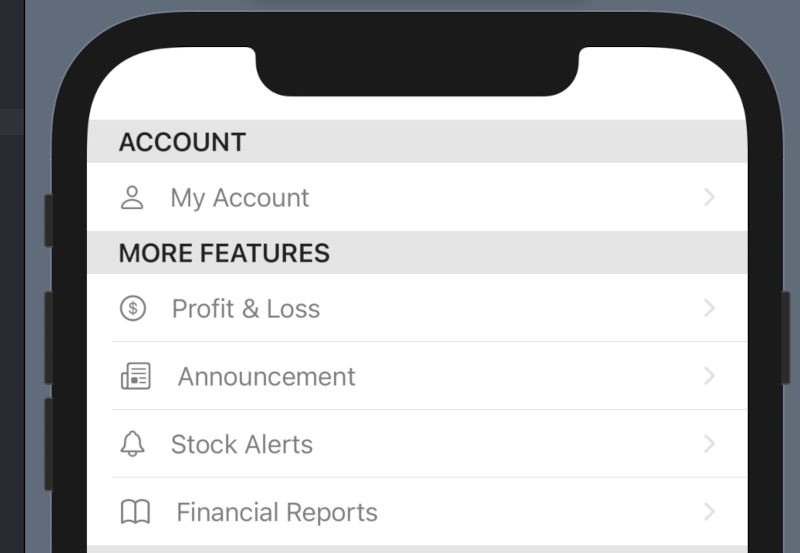
To make it simple, each row of our Settings’ menu consists of only an image from SF Symbol and the title of what’s it about as shown in the image below:
Therefore, we need a custom View, a struct of SettingRowView, which lays out the image view and the text view in a HStack as follows:
struct SettingRowView : View {
    var title : String
    var systemImageName : String

    var body : some View {
        HStack (spacing : 15) {
            Image(systemName: systemImageName)
            Text (title)
        }
    }
}
Let’s start coding the menu with a List view embedded inside a NavigationView. And we have a number of sections in our menu with each having one or more items.
And each row is a NavigationLink, with its destination to an EmptyView for simplicity in our example here (EmptyView is a view that doesn’t contain anything provided by SwiftUI). And the SettingRowView is embedded inside the NavigationLink, as follows:
NavigationView {
   List {
      // first section
      Section(header: Text("Account")) {
          NavigationLink(destination: EmptyView(), label: {
             SettingRowView(title: "My Account",
             systemImageName: "person")
          })
      }

      // second section
      Section(header: Text("More Features")) {
           NavigationLink(destination: EmptyView(), label: {
              SettingRowView(title: "Profit & Loss",
              systemImageName:"dollarsign.circle")
           })

           NavigationLink(destination: EmptyView(), label: {
               SettingRowView(title: "Announcement",
               systemImageName: "newspaper")
           })
           ...
           ...
      }
      // and more sections below ....
   }
   .navigationTitle(Text("Settings"))
}
When it’s run, the result is shown below:
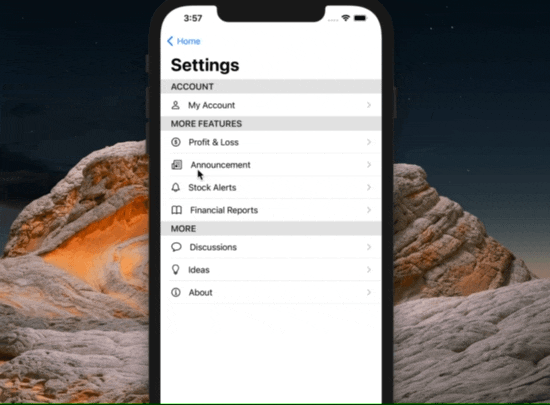
Build your Setting page from a dynamic list to avoid having to hard code massive lines of code!
To avoid having to hard code the menu in a huge Setting page, we can build a dynamic list by the use of ForEach struct. And we have the menu sections and items stored on a JSON file in Bundle.
We have the following JSON file stored in main Bundle.
[{
    "id": 1,
    "name": "Account",
    "items": [
        {
           "id": 1,
           "title": "My Account",
           "imageName": "person",
           "destination": "account"
        }
    ]
},
{
    "id": 2,
    "name": "More Features",
    "items": [
        {
           "id": 1,
           "title": "Profit & Loss",
           "imageName": "dollarsign.circle",
           "destination": "profit_lost"
        },
        {
           "id": 2,
           "title": "Announcement",
           "imageName": "newspaper",
           "destination": "announcement"
        }
        ...
        ...
     ]
}]
The above JSON contains a number of menu sections which each contains one or more menu items and they can be decoded into the following struct, a MenuSection and a MenuItem.
struct MenuSection : Decodable, Identifiable {

    var id : Int

    var name : String

    var items : [MenuItem]
}
struct MenuItem : Decodable , Identifiable , Equatable {
    enum Destination : String, Decodable {
        case account

        case announcement

        case profit_lost

        case stock_alert
    }

    var id : Int

    var title : String

    var imageName : String

    var destination : Destination
}
We can load and decode the JSON file into MenuSection as follows, by using the Bundle.main.decodeJson() extension function introduced in our previous tutorial, as below:
let menuSections = Bundle.main.decodeJson([MenuSection].self, fileName : "Menus.json")So we use ForEach struct to loop over the the decoded array of MenuSection and create the sections. And inside each section, there is another ForEach to create the menu items.
List {
    ForEach(menuSections) { section in
       Section(header:Text(section.name)){
           ForEach(section.items) { item in
               NavigationLink(destination:
                       get(destination: item.destination)) {
                   SettingRowView(title: item.title,
                        systemImageName: item.imageName)
               }
           }
       }
    }
}
.navigationTitle(Text("Settings"))
.listStyle(GroupedListStyle())
In the above List, we use the built-in modifier listStyle() after the navigationTitle(), to give it a “grouped” style of UITableView instead of the default “plain” style.
Please take note the MenuItem has a destination, which is an enum case, that can be determined by a @ViewBuilder function what the destination of the NavigationLink is.
And the @ViewBuilder function get(destination:) that returns some View as the destination of the NavigationLink is as follows :
It basically uses a switch statement to instantiate our custom views based on the destination, which are AccountView, AnnouncementView, ProfitAndLossView and StockAlertView in our example here.
@ViewBuilder
private func get( destination : MenuItem.Destination ) -> some View {
switch (destination){
case .account :
AccountView()
case .announcement :
AnnouncementView()
case .profit_lost :
ProfitAndLossView()
case .stock_alert :
StockAlertView()
}
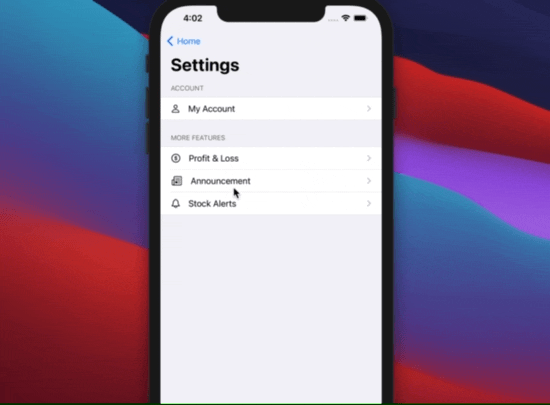
}The result is as below:
That’s all for now. The complete source code can be found on GitHub.
2 thoughts on “How to build app Settings page with NavigationView, List, Section & NavigationLink in SwiftUI”