In the previous tutorial, we’ve learned how to add FirebaseUI to your Xcode project, how to present the FirebaseUI’s viewController in SwiftUI app using UIViewControllerRepresentable and how to deal with the various setups required by Google, FB etc for adding their respective sign-in capabilities to your SwiftUI apps.
We’ve also built a AuthManager that is ready to be used for handling sign in and sign out of the users. Now, in this tutorial, we are going to look at how it can be done in SwiftUI using MVVM architecture – a cleaner approach.
In MVVM pattern, we need our Model, ViewModel and View.
The Model
The model is our user, which is a simple struct that has a few properties as follows, for storing the information of the user that you’re concerned with.
struct User : Codable {
    var userId : String = ""
    var displayName : String = ""
    private var signedIn : Bool = false

    var hasSignedIn : Bool {
        set(newSignedIn){
            self.signedIn = newSignedIn
        }

        get{
            return self.signedIn && AM.shared.isSignedIn()
        }
    }
}
The User model has three properties :
- The userId is for holding the userId obtained from Firebase, which will be useful if you want to use it for retrieving further information from Firebase.
- The displayName is to hold the displayName provided by the signed-in social network.
- The signedIn is a boolean variable which is private, but its value can be set via the proxy property hasSignedIn.
- The hasSignedIn is a proxy property for signedIn, with both getter and setter, whereas the getter will return true only when the signedIn is true and the AM.shared.isSignedIn() is true.
Please note that we declare a typealias AM for our AuthManager introduced in the previous tutorial, which has a singleton shared property.
Simple persistency for the User model
We need somewhere to persist the user’s information and the user’s sign-in state. So, when the app is run or relaunched anytime, the information and the state is persisted before any sign-out action is taken place.
So, we build a class which handles the persistency of the User model to the UserDefaults, as follows:
typealias DS  = UserDataStore

struct UserDataStore {

    static let shared = UserDataStore()
    private let key = "com.techchee.savedUser"

    func save(_ user : User ){
        let encoder = JSONEncoder()
        if let encoded = try? encoder.encode(user) {
            let defaults = UserDefaults.standard
            defaults.set(encoded, forKey: key)
        }
    }

    func load() -> User{
        let defaults = UserDefaults.standard
        if let savedUser = defaults.object(forKey: key) as? Data {
            let decoder = JSONDecoder()
            if let loadedUser = try? decoder.decode(User.self, from: savedUser) {
                return loadedUser
            }
        }
        return User() // instantiate a new User and return
                      // if it's not stored previously
    }

    func removeUser() {
        let defaults = UserDefaults.standard
        defaults.removeObject(forKey: key)
    }
}
The above UserDataStore simply provides three methods:
- save(_:) – simply encodes a User struct and stores it to the UserDefaults. Please note that our struct User conforms to the Codable protocol.
- load() – basically loads the stored data by the key and decode it into a User struct and returns it.
- removeUser() – will remove the stored User from the UserDefaults.
Note : For simplicity, this tutorial uses UserDefaults to store the user info. If you’re concerned with the security of storing sensitive information on the UserDefaults, you should look into using KeyChain to do that instead of UserDefaults.
Please note the UserDataStore is given a shorthand typealias DS.
The View Model
The code for UserViewModel is as follows:
import FirebaseUI
class UserViewModel : NSObject, ObservableObject {

    @Published private var user =  DS.shared.load()

    override init(){
        super.init()
        AM.shared.setAuthDelegate(self)
    }

    var hasSignedIn : Bool {
        get{
            user.hasSignedIn
        }
        set(newHasSignedIn){
            user.hasSignedIn = newHasSignedIn
        }
    }

    var userId : String {
        user.userId
    }

    var displayName : String {
        user.displayName
    }
}
The UserViewModel is the one exposed to the SwiftUI Views and reflects the View’s state and it’ll update the User model with any action from the views such as sign in, sign out etc.
The user property, which is our User model is given the @Published property wrapper, its initial value is provided by DS.shared.load(), which loads it from the UserDefaults or instantiates a new one if it’s not previously stored.
The UserViewModel is basically a wrapper for the User model, and it provides proxy properties for the properties of the User model.
Please note the UserViewModel needs to import FirebaseUI, as we are going to make the UserViewModel to implement the FUIAuthDelegate protocol for handling the success of sign in and receiving the authenticated data result from Firebase etc.
Therefore, in the init() method of the UserViewModel, we set the UserViewModel itself as the authDelegate of our AuthManager, by invoking AM.shared.setAuthDelegate(self).
The UserViewModel implements the FUIAuthDelegate protocol as follows:
extension UserViewModel : FUIAuthDelegate{
    func authUI(_ authUI: FUIAuth, didSignInWith authDataResult: AuthDataResult?, error: Error?) {

        if let err = error {
            print("It's Error::\(err)")
            return
        }

        if let result = authDataResult {
            self.user.hasSignedIn = true
            if let name = result.user.displayName {
                self.user.displayName = name
            }
            self.user.userId = result.user.uid
            // persist the user to
            // UserDefaults
            DS.shared.save(user)
        }
    }
}
Basically, in the above what it does is when there is no error and the authDataResult is not nil, it’ll get the required user info and set the hasSignedIn property of the user to true and save the user to the UserDefaults for persistency.
And the UserViewModel also has the following extension function for handling sign out, which it basically invokes the AM.shared.signOut() and when there is no error, the hasSignedIn property of the user will be set to false and the saved user in the UserDefaults will be removed.
extension UserViewModel {

    func signOut(){
        AM.shared.signOut{
            err in
            if let err = err {
                print("Signed out error :\(err)")
            }
            else {
                self.user.hasSignedIn = false
                DS.shared.removeUser()
            }
        }
    }
}
The Views
We have a number of views here :
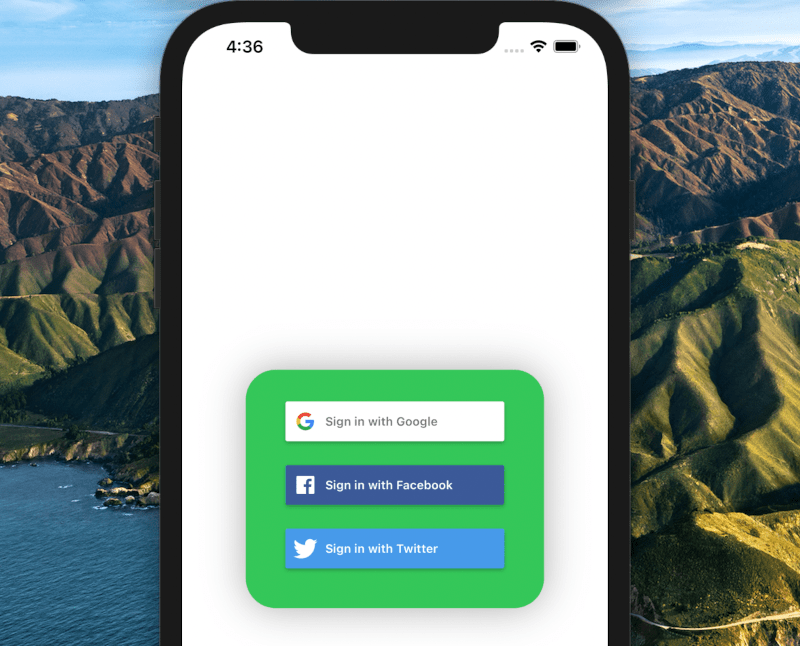
- SignInView – which we already built in the previous tutorial, which basically presents the user with a few of the social network sign-in buttons provided by FirebaseUI.
The SignInView is the default view presented to the user when the user has not signed in yet. - TabbedView – which basically presents a SwiftUI TabView which has two views inside it only for the simplicity of this tutorial, as shown below, they are the HomeView and the SettingsView. This is presented to the user when the user has signed in.
The SwiftUI code for the TabbedView is as follows:
import SwiftUI
struct TabbedView : View {
    @State private var selectedTab : Int = 0
    var body : some View {

        TabView(selection: $selectedTab ){
            HomeView()
            .tabItem {Label("Home", systemImage: "house")}
            .tag(0)

            SettingsView()
            .tabItem {Label("Settings", systemImage: "gear")}
            .tag(1)
        }
        .onAppear{
            // always reset back to zero
            self.selectedTab = 0
        }
    }
}
TabView in SwiftUI is easy to use. All you need is just instantiate a TabView with an optional binding parameter selection. Then put views inside it and specify the title and image of the tab bar item of each view by the view’s modifier tabItem().
You can also set the tag of each view by the modifier tag(), so the TabView will know which view is for first, second tab and so on. Please note that the first tab is at index or tag 0, second tab is tag 1 and so on.
So, the above code simply has a TabView with two views, the HomeView and SettingsView inside it. The @State variable selectedTab, is set back to zero inside the onAppear modifier to make sure it always goes to HomeView after the user has signed in instead of the last selected tab.
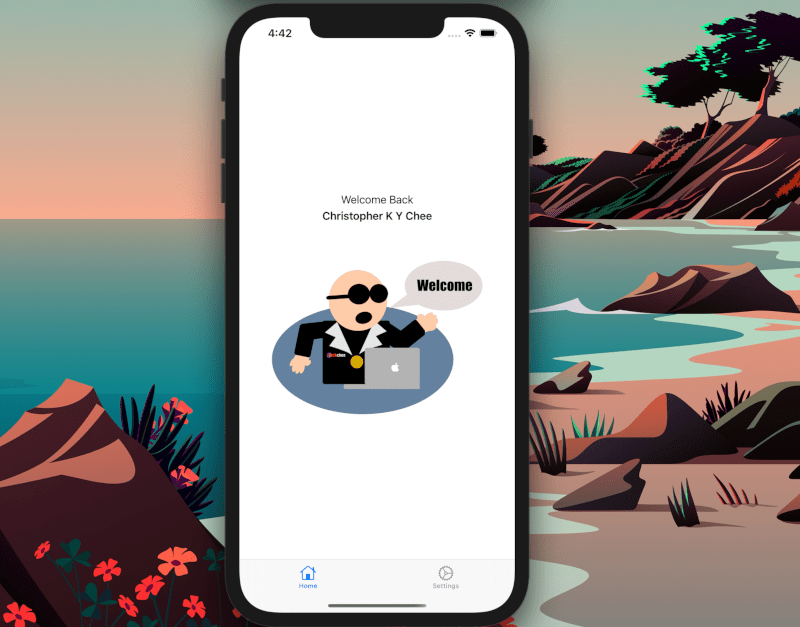
The two views inside the TabView – HomeView and SettingsView.
The HomeView simply displays a welcome message and the user’s name and an welcome image.
import SwiftUI

struct HomeView : View {
    @EnvironmentObject private var userViewModel : UserViewModel

    var body : some View {
        VStack(spacing:5) {

            Text("Welcome Back")
            .font(.body)

            Text(userViewModel.displayName)
            .font(.headline)

            Spacer()
            .frame(height:50)

            Image("welcome")
        }
    }
}
Whereas the SettingsView is meant for various settings of the app and at the bottom of the list, we add a “Sign Out” Button – it is where most apps usually place their sign out button. The code is as follows:
struct SettingsView : View {

    @State private var showSignOutPrompt : Bool = false

    @EnvironmentObject private var userViewModel : UserViewModel

    var body : some View {

        NavigationView {
           List {
              // first section
              Section(header: Text("Account")) {
                  NavigationLink(destination: EmptyView(), label: {
                     SettingRowView(title: "My Account",
                     systemImageName: "person")
                  })
              }
              // More sections for other settings...
              ...

              // Last section with the Sign Out Button
              Section(header: Text("")) {
                    Button(action: {
                        // present a confirmation alert
                        self.showSignOutPrompt.toggle()
                    }){
                       SettingRowView(title: "Sign Out",
                          systemImageName: "arrow.backward.circle")
                      .foregroundColor(.gray)
                    }
              }
           }
           .navigationTitle(Text("Settings"))
        }
        .alert(isPresented : $showSignOutPrompt){
             // alert to prompt the user
             // for sign out confirmation
             Alert(title: Text("Are you sure you want to sign out now?"),
             primaryButton: .default(Text("Yes")) {
                // invoke userViewModel.signOut,
                // when user taps Yes
                userViewModel.signOut()
             },
             secondaryButton: .cancel(Text("No")))
        }

    }
}
We borrow the code for the SettingsViews from one of our tutorials – How to build app Settings page with SwiftUI.
Basically, it consists of a List with Sections and each Section will have navigation link to different setting of the app. But for the sake of this tutorial, it’s just a dummy Settings page, which the tap of each setting will go to an EmptyView.
And we place a “Sign Out” Button in the last section so when it’s tapped will present a confirmation alert if the user really wants to sign out.
When the user is confirmed to sign out, it’ll invoke userViewModel.signOut() to sign the user out.
The View Model – UserViewModel is shared across views by @EnvironmentObject property wrapper
You should have noticed that our view model – the UserViewModel is shared across the HomeView and SettingsView by using the @EnvironmentObject property wrapper. And we need to have somewhere to inject it by using the modifier environmentObject().
So, in our app entry point @main, we inject the UserViewModel by using environmentObject() modifier, as below:
@main
struct SwiftUIOAuthApp: App {

    @StateObject private var userViewModel = UserViewModel()

    var body: some Scene {
        WindowGroup {
             view()
            .environmentObject(userViewModel)
        }
    }
}
The UserViewModel is created with the @StateObject property wrapper – a way to ensure it does not get destroyed when the view updates.
The view() function is just a @ViewBuilder function that returns some View as below:
extension SwiftUIOAuthApp {

    @ViewBuilder
    private func view() -> some View {

        if ( userViewModel.hasSignedIn ){
            TabbedView()
        }
        else {
            SignInView()
        }
    }
}
What it does is checking if the user has signed in by checking the hasSignedIn property of the userViewModel – will instantiate the TabbedView when it’s true, else will instantiate the SignInView.
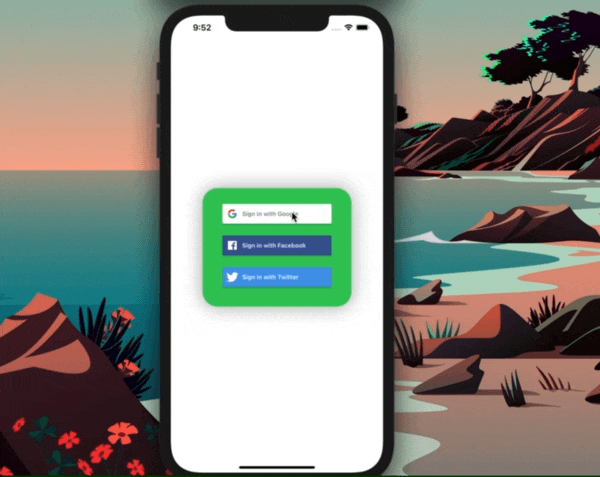
So, the result is as follows, when it’s run on the simulator.
That’s all for now. Hope you enjoy this tutorial and happy learning! The complete source code of this and the previous tutorials is available on GitHub.
Note: It’s better you follow the previous tutorial on how to setup your own Firebase project and download your own GoogleService-Info.plist and follow the steps on the few social networks, Google and FB to setup your own.
As it’s very likely, the respective Firebase project and the Google OAuth and FB projects used in this tutorial will be deleted in the future.