SwiftUI comes with quite a number of built-in 2D shapes such as Rectangle, Circle, Ellipse, Capsule, RoundedRectangle etc. If all these are not enough to fulfil your needs, you can also create your own custom shapes by using Path
To create a custom shape using Path is easy, such as follows, which you can just straightaway use the provided Path and it provides you a closure with a parameter, which you can call a number of its methods such as addArc, addCurve, addRect, addLine etc to create a complete path.
import SwiftUI
struct ContentView{
    var body : some View {
        Path { path in
            path.move(to: CGPoint(x : 200, y : 100))
            path.addLine (to : CGPoint(x: 300, y : 200))
            path.addLine (to : CGPoint(x: 100, y : 200))
            path.addLine (to : CGPoint(x: 200, y : 100))
        }
        .fill(Color.green)
    }
}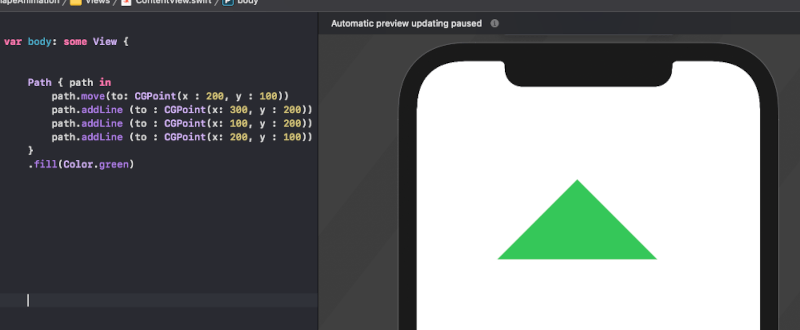
Basically, the above simply builds a triangle. First of all, we need the path to start at a point, which we use its move(to:) method to move to a point to start with. The point is an instance of CGPoint which is from CoreGraphics framework.
And then we add the 3 lines that make up the 3 edges of the triangle by invoking the method addLine(to:). The following diagram is just good enough to illustrate the orders of the lines added to form the triangle.

Create your own custom shapes for reusability
The SwiftUI comes with the Shape protocol, which you just need to implement a single method to build your own custom shapes.
The following code shows how you can implement the path(in:) method of the Shape protocol to build a reusable triangle shape.
import SwiftUI
struct Triangle : Shape {

    func path(in rect: CGRect) -> Path {
        var path = Path()

        path.move(to: CGPoint(x: rect.minX, y: rect.maxY))
        path.addLine(to: CGPoint(x: rect.midX, y: rect.minY))
        path.addLine(to: CGPoint(x: rect.maxX, y: rect.maxY))
        path.addLine(to: CGPoint(x: rect.minX, y: rect.maxY))

        return path
    }
}
In the above, inside the path method, you can instantiate a Path and invokes its move(to:) to start at a point.
The path method provides a parameter rect which is a CGRect that provides a number of useful properties such as :
- The minimum values of X and Y (minX and minY) in the coordinates
- The maximum values of X and Y (maxX and maxY)
- And the respective mid point values of X and Y (midX and midY).
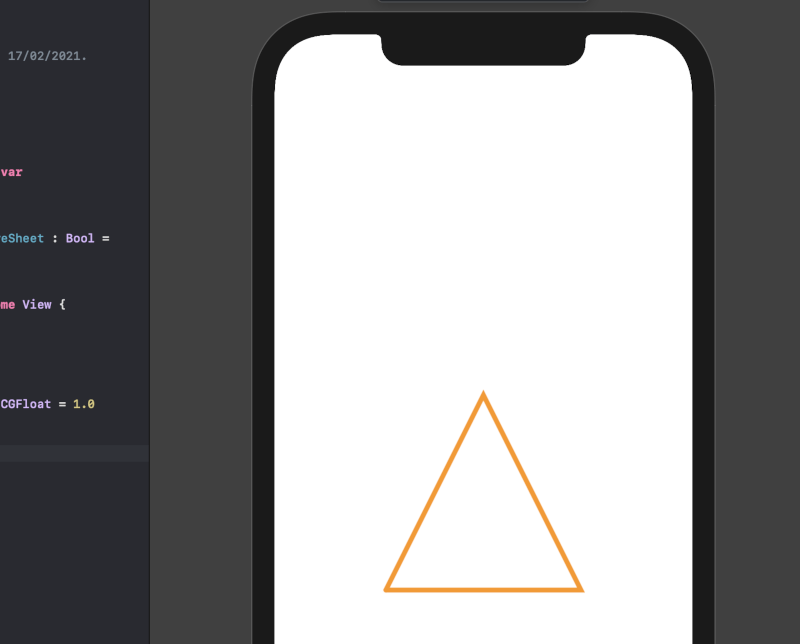
Once you’ve got your own custom shape such as the above, a triangle, you can then use it in any of your SwiftUI view, as follows:
import SwiftUI
struct ContentView : View {

   var body : some View {

        Triangle()
        .stroke(Color.orange,
             style: StrokeStyle(lineWidth: 5, lineCap: .round, lineJoin: .miter))
        .frame(width: 200, height: 200, alignment: .center)

   }
}
The result is as follows – a triangle with an orange color stroke :
Create a Polygon shape
A polygon can be created with the following code, which you can then use it to create any polygon with 3 sides and above such as a triangle, a Pentagon (5-sided polygon), a Hexagon (6-sided) etc.
struct Polygon : Shape {
   var sides : Int = 5

   func path(in rect : CGRect ) -> Path{
        // get the center point and the radius
        let center = CGPoint(x: rect.width / 2, y: rect.height / 2)
        let radius = rect.width / 2

        // get the angle in radian,
        // 2 pi divided by the number of sides
        let angle = Double.pi * 2 / Double(sides)
        var path = Path()
        var startPoint = CGPoint(x: 0, y: 0)

        for side in 0 ..< sides {

            let x = center.x + CGFloat(cos(Double(side) * angle)) * CGFloat (radius)
            let y = center.y + CGFloat(sin(Double(side) * angle)) * CGFloat(radius)

            let vertexPoint = CGPoint( x: x, y: y)

            if (side == 0) {
                startPoint = vertexPoint
                path.move(to: startPoint )
            }
            else {
                path.addLine(to: vertexPoint)
            }

            // move back to starting point
            // needed for stroke
            if ( side == (sides - 1) ){
                path.addLine(to: startPoint)
            }
        }

        return path
  }
}
The above code is simply some back to school trigonometry. First of all, we need to get the central angle of the Polygon by dividing the circle (2 pi) by the number of sides or angles.
And then we can iterate through the sides and calculate the x and y coordinate of each vertex or corner.
The x and y of each vertex can be calculated by (on line 17 and 18) :
- Firstly, get the ratio of sides - the adjacent and the opposite by the cosine and sine of each angle respectively.
The x and y distance from the center can be calculated by multiplying the radius by the adjacent and opposite ratios respectively. - Then add the x and y distance with the center x and y to get the coordinate of each vertex.
The following diagram shall illustrate clearly :
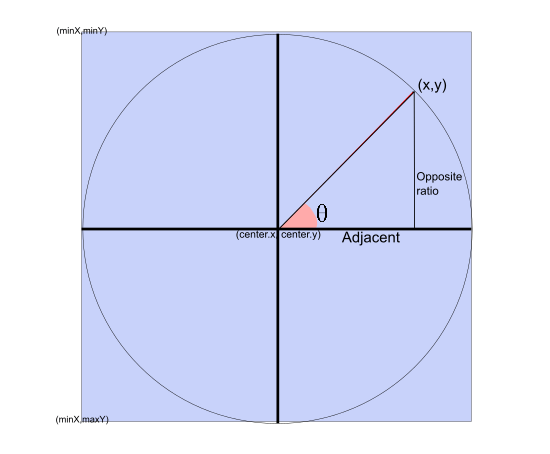
Please note that we use move(to:) to add the first coordinate to start with, and then addLine(to:) for other points. And we also store the starting point as we need to add a line back to the starting point to close the path.
So, with the above custom Polygon shape, you can simply use it anywhere in your SwiftUI view to create any polygon shapes, such as triangle, Pentagon, Hexagon by simply specifying the number of sides, as follows:
import SwiftUI
struct ContentView : View {
    var body : some View {
        HStack(spacing :10) {

             Polygon(sides : 3) // Triangle with 3 sides
             .fill(Color.red)
             .frame(width: 100)

             Polygon() // Pentagon (default is 5 sides)
             .stroke(Color.green, lineWidth: 3)
             .frame(width : 100)

             Polygon(sides : 6 ) // Hexagon
             .fill(Color.blue)
             .frame(width : 100)
        }
    }
}
The following is how it's shown on the Xcode preview :

A Star shape
The following code can be used to create any star shape with 3 points and above.
import SwiftUI
struct Star : Shape {
    var points : Int = 5 // If it's not specified it's a 5-point star
    var innerRatio : Double = 0.2

    func path(in rect : CGRect) -> Path {

        let center = CGPoint(x: rect.width / 2, y: rect.height / 2)
        let angle = Double.pi / Double(points)
        var path = Path()
        var startPoint = CGPoint(x: 0, y: 0)

        let outerRadius = center.x
        let innerRadius = outerRadius * innerRatio

        let maxCorners = 2 * points

        for corner in 0 ..< maxCorners {

            let radius = (corner % 2) == 0 ? outerRadius : innerRadius

            let x = center.x + CGFloat(cos(Double(corner) * angle)) * CGFloat (radius)
            let y = center.y + CGFloat(sin(Double(corner) * angle)) * CGFloat(radius)
            let point = CGPoint( x: x, y: y)

            if (corner == 0) {
                startPoint = point // store the starting point
                path.move(to:point )
            }
            else {
                path.addLine(to: point)
            }
            // move back to starting point
            if ( corner == (maxCorners - 1) ){
                path.addLine(to: startPoint)
            }
        }

        return path
    }
}
Basically, the above code is more or less the same with the code used to create a Polygon, except the Star shape has double the corners or points that a Polygon has i.e. each point (or corner) of a Star will have one inner corner or point.
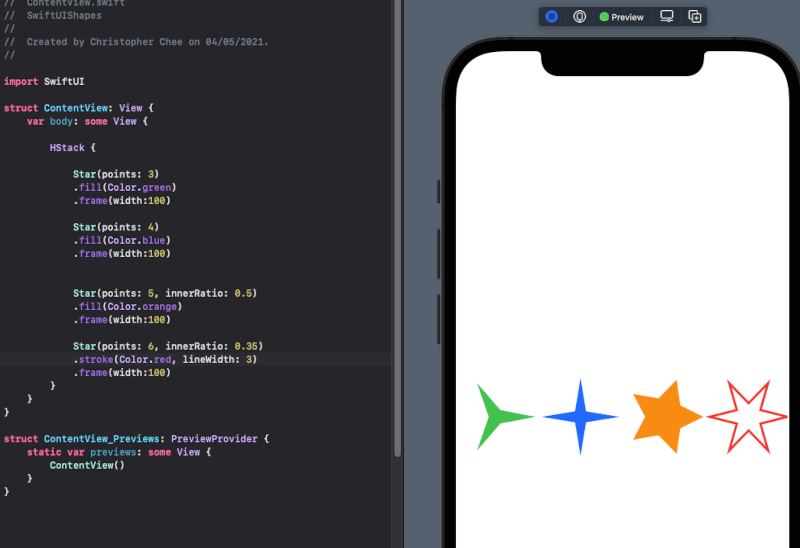
So, the following code is an example on creating a few star shapes and arranged in a HStack in a SwiftUI view.
struct ContentView: View {
    var body: some View {

        HStack {

            Star(points: 3)
            .fill(Color.green)
            .frame(width:100)

            Star(points: 4)
            .fill(Color.blue)
            .frame(width:100)

            Star(points: 5, innerRatio: 0.5)
            .fill(Color.orange)
            .frame(width:100)

            Star(points: 6, innerRatio: 0.35)
            .stroke(Color.red, lineWidth: 3)
            .frame(width:100)
        }
    }
}
The parameter innerRatio is to control the sharpness of the star's corners, the lower the value the sharper it is.