This is a tutorial on how to add sign in capabilities in your SwiftUI app by using Firebase and the FirebaseUI. FirebaseUI is built on top of FirebaseAuth which comes with a number of drop-in authentication solutions including sign-in with email, phone, Apple and a number of social networks including Google , Facebook, Twitter etc.
This tutorial will walk your through on how to add FirebaseUI to your Xcode project by CocoaPods, build a SwiftUI View by using UIViewControllerRepresentable to wrap a custom AuthViewController from the FirebaseUI and a number of setups required with the Google and FB sign in to get the app working.
Let’s get started – add FirebaseUI by CocoaPods
First of all, you need to add FirebaseUI by using CocoaPod. I was trying to add it by using Swift Package Manager, but it doesn’t seem to work at least at the time of writing this. Will update this post when I’ve found a fix later.
To add FirebaseUI by CocoaPods, all you need to do is by creating a Podfile as follows:
platform :ios, '9.0'
use_frameworks!
target 'ProjectName' do
project 'Path/ProjectName.xcodeproj'

pod 'FirebaseUI'
end
Replace the above the Path and ProjectName with yours and then run “pod install”.
A quick note – on the new Mac with Apple Silicon M1 chip, you’ll have to do additional in order to get CocoaPod working including :
- Set the terminal to be opened using Rosetta
- Then run the followings :
sudo arch -x86_64 gem install ffi

arch -x86_64 pod install
Once you’re successful with your CocoaPods installation of FirebaseUI, you should get your Xcode to open the file “ProjectName.xcworkspace” instead of the original “ProjectName.xcodeproj”.
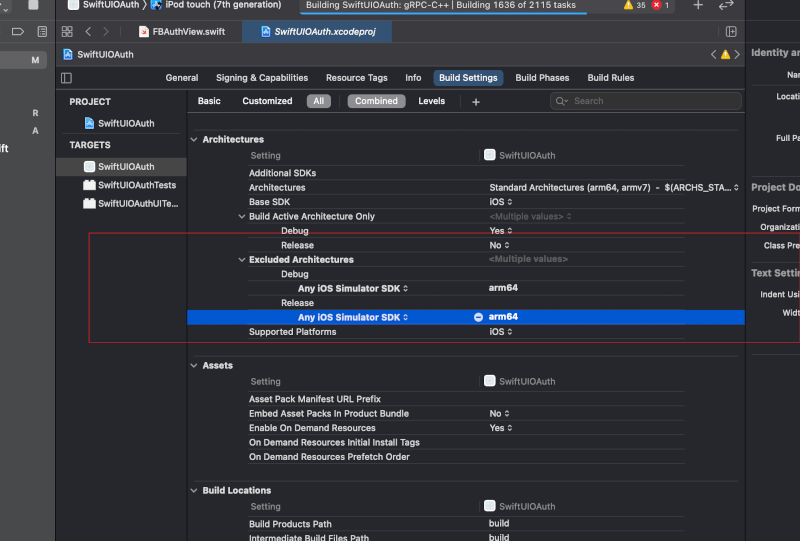
In your Xcode project, you’ll also have to set the excluded architecture to arm64 in both your project target and the Pod to avoid any linking error, as the screenshot below.
After all the above, you should be able to compile your class or struct with the import of Firebase, FirebaseAuth and FirebaseUI etc without any error :
import Firebase
import FirebaseUI
...
Let’s start coding!
So, now we’re ready to get started working on our project and start coding.
Adding FirebaseUI in your iOS app for sign-in capabilities is quite straightforward. The documentation for how to use FirebaseUI is available here.
The usual Swift code that you need to add FirebaseUI to your app is simply as follows:
import FirebaseUI
...
FirebaseApp.configure() // Initialize the firebase before anything
let authUI = FUIAuth.defaultAuthUI() // get the defaultAuthUI
// set an array of providers e.g. Google, FB & Twitter
authUI.providers = [FUIGoogleAuth(),
                    FUIFacebookAuth(),
                    FUIOAuth.twitterAuthProvider()]
// set the class that implements
// the FUIAuthDelegate protocol for callback
authUI.delegate = the_delegate
After the above, you can then invoke the authUI.authViewController() to provide you a view controller which you can present in a UIKit app.
Or in SwiftUI, you can wrap the authViewController with the UIViewControllerRepresentable and use in any of your SwiftUI views.
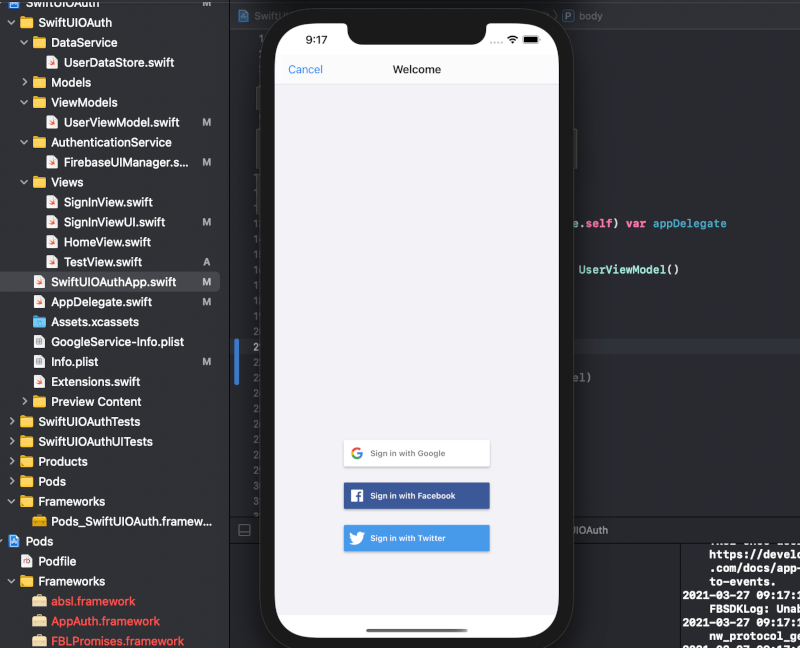
The default authViewController provided by FirebaseUI comes with a grey background and navigation as shown below, which you might not like it, and we’ll show you how you can have your own custom one.
Build an AuthManager to encapsulate the above code
In our approach here, for cleaner code and reusability, we build a class, just call it AuthManager to encapsulate the above boilerplate that needs to handle Firebase and FirebaseUI for setups, signing in and out, checking if the user is signed in etc.
And it also provides a custom authViewController, which you can customize its background with colors or images when needed.
The AuthManager class is as follows:
import Firebase
import FirebaseUI
typealias AM = AuthManager
class AuthManager : NSObject{

    static let shared = AuthManager()

    var authViewController : UIViewController {
        return MyAuthViewController(authUI: FUIAuth.defaultAuthUI()!)
    }

    init(withNavigationBar : Bool = false){
        FirebaseApp.configure()
        super.init()
        self.setupProviders()
    }

    private func setupProviders(){
        // For now, we just add Google, FB and Twitter only
        let providers: [FUIAuthProvider] =
           [ FUIGoogleAuth(),
             FUIFacebookAuth(),
             FUIOAuth.twitterAuthProvider(), ]
        FUIAuth.defaultAuthUI()?.providers = providers
    }
}
Basically, the above AuthManager has some setups for the required ones for FirebaseUI in its initializer. The setupProviders() method is also called in the init() method to set the Google, FB and Twitter providers.
We have our own custom FUIAuthPickerViewController, which is exposed by the “authViewController” property of type of generic UIViewController.
The authViewController is required later by having a UIViewControllerRepresentable to wrap it for creating a SwiftUI View.
The AuthManager class also has a method for handling signing out the user and a method for checking if the current Firebase user is signed in, as below:
extension AuthManager {
    // an optional handler closure for error handling
    func signOut(onError handler : ((Error?) -> Void)? = nil ){
        do {
            try FUIAuth.defaultAuthUI()?.signOut()
            if let handler = handler {
                handler(nil)
            }
        }
        catch (let err){
            if let handler = handler {
                handler(err)
            }
        }
    }

    func isSignedIn() -> Bool {
        if let _ = Firebase.Auth.auth().currentUser{
            return true
        }
        return false
    }
}
And a setter method that accepts the pass in of another class that implements the FUIAuthDelegate.
extension AuthManager {
    func setAuthDelegate(_ delegate : FUIAuthDelegate){
        FUIAuth.defaultAuthUI()?.delegate = delegate
    }
}
The custom authViewController MyAuthViewController – you can have a custom authViewController by subclassing the FUIAuthPickerViewController in FirebaseUI.
For simplicity, we only have one with some tricks to set the background color to transparent as below, so it can blend in well with your SwiftUI views with any background color:
class MyAuthViewController : FUIAuthPickerViewController {

    override func viewDidLoad() {
        super.viewDidLoad()
        let scrollView = view.subviews[0]
        scrollView.backgroundColor = .clear
        let contentView = scrollView.subviews[0]
        contentView.backgroundColor = .clear
        view.backgroundColor = .clear
    }
}
UIViewControllerRepresentable to wrap the authViewController for SwiftUI
We have a struct SignInViewUI which implements the UIViewControllerRepresentable as simple as follows:
import SwiftUI

struct SignInViewUI: UIViewControllerRepresentable {

    func makeUIViewController(context: UIViewControllerRepresentableContext<SignInViewUI>) ->
        UIViewController {
        return AM.shared.authViewController
    }

    func updateUIViewController(_ uiViewController: UIViewController,
               context: UIViewControllerRepresentableContext<SignInViewUI>) {
        // empty
    }
}
In the function makeUIViewController(context:) it returns the authViewController of our AuthManager. Please note that the AuthManager exposes a singleton property “shared” for the convenience of use and it has a global typealias AM as a shorthand to refer it.
Let’s test our SignInViewUI in a SwiftUI View
import SwiftUI
struct SignInView : View {
    var body : some View {
         VStack {
            SignInViewUI()
            .padding()
            .frame(width: 300, height:240)
            .background(Color.green)
            .cornerRadius(30)
            .shadow(radius: 20 )
        }
    }
}
In the above, we simply build a SwiftUI view called SignInView, which basically displays a VStack with the SignInViewUI inside it. The SignInViewUI is given some styling of green background color, rounded corner and shadowed border etc. The result when it’s shown on the Xcode Preview is as below:

But it’ll crash when running it on a Xcode Simulator or a device!
So, so far so good, you already have each button of the social sign-in provided by FirebaseUI nicely laid out on your SwiftUI View as shown on the preview. But if you want to run it on a device or the Xcode simulator, it’ll definitely crash from here!
As in order for Firebase or FirebaseUI to work on your app, you’ll need to have a number of setups both in the Firebase console and the respective developer consoles of the sign-in providers! We are going to walk you through below!
First of all, get the GoogleService-Info.plist from Firebase console
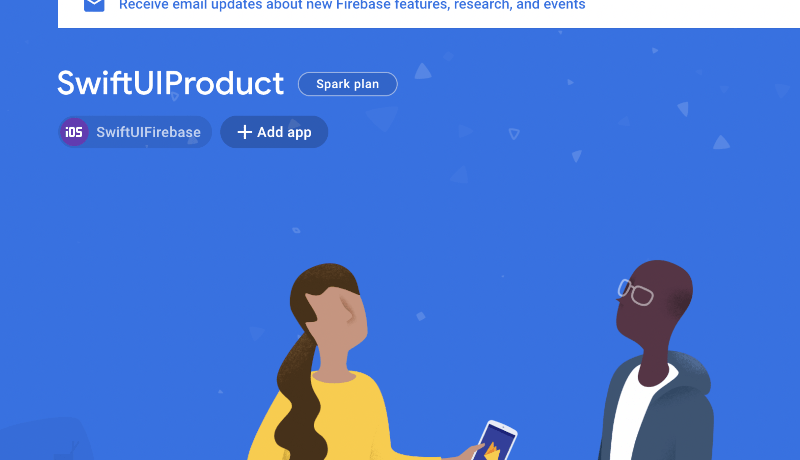
To get Firebase working in your project, you’ll need to create a Firebase project and add an iOS app in it in your Firebase console, as shown in the screenshot below, by clicking +Add app:
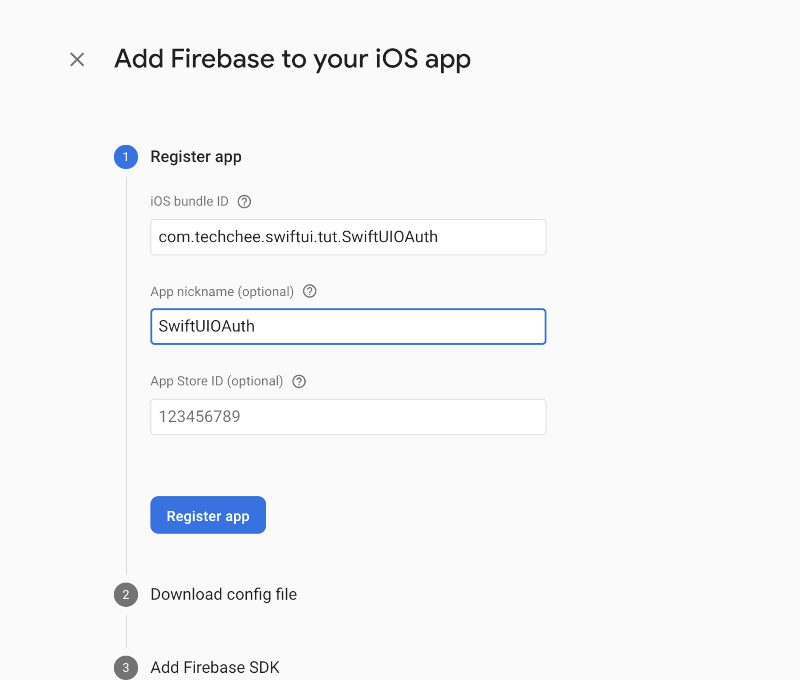
Then add an iOS app with the Bundle ID of your app, as follows:
And then download and add the GoogleService-Info.plist in your Xcode project to the location of where you’re told to.
Setups for the respective sign-in providers
To keep this tutorial not too lengthy, we are only going to show you how to setup for adding Google OAuth and Facebook sign-in capabilities in your SwiftUI app by using the FirebaseUI.
In short, each of the social network sign-in will need you to get their respective setups right, API keys etc etc from their developer consoles and set in your Xcode. And you’ll need to enable them in your Firebase console as well. The Firebase documentation has the info telling you how to go about it with each of them
Setup for Google OAuth sign in
To begin with Google OAuth, you’ll have to do the followings in Firebase Console, Google Cloud Platform and your Xcode respectively:
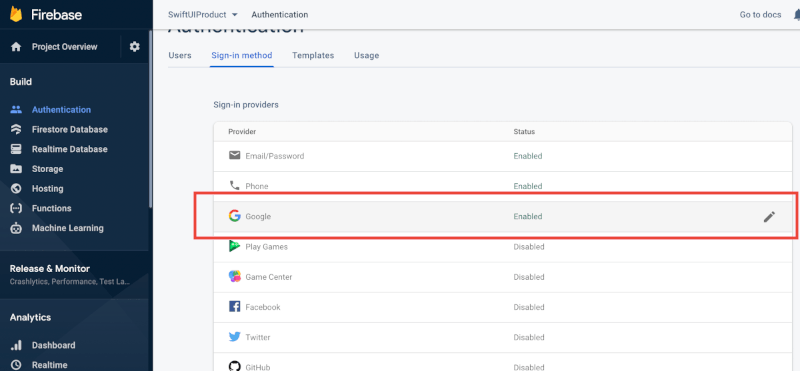
1. Enable the Google Sign In in the Authentication tab in Firebase console, as shown in the screenshot below:
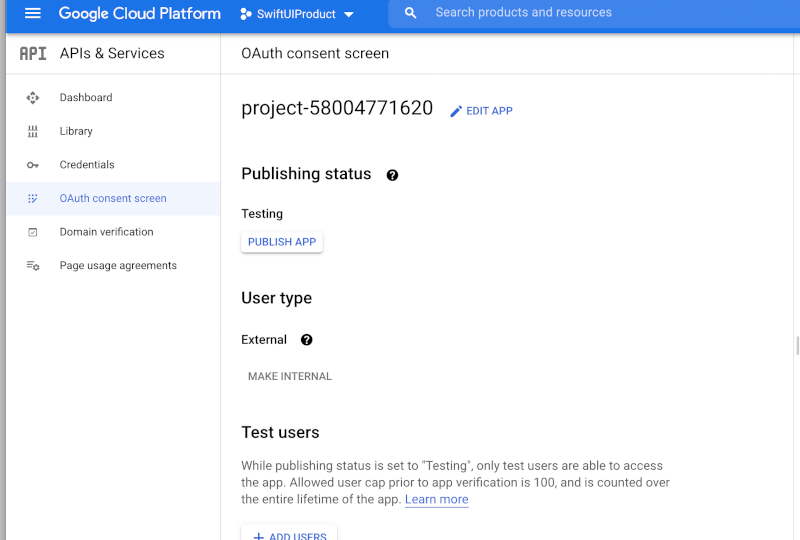
2. In Google Cloud Console – you have to add OAuth consent to your project, as shown below:
3. In Xcode – add the reversed client ID as a URL scheme. Click on your project target at the Info tab, scroll down to the bottom, which you can find the URL Types and click the + to add one as shown below.
The REVERSE_CLIENT_ID can be found from the GoogleService-Info.plist, just copy it and paste it there.

Setup for Facebook Login
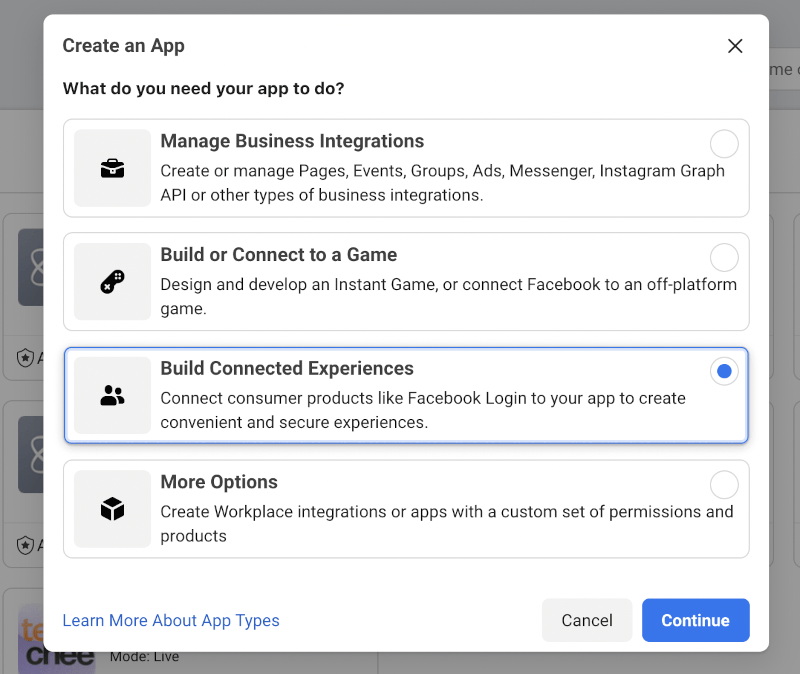
1. Create your app in Facebook for Developers, and then proceed with the completion of the various steps you’re asked to fill in, as below.
For the FB login purpose, you’ll just need to choose the Build Connected Experience as below, then proceed to add your FB app etc:
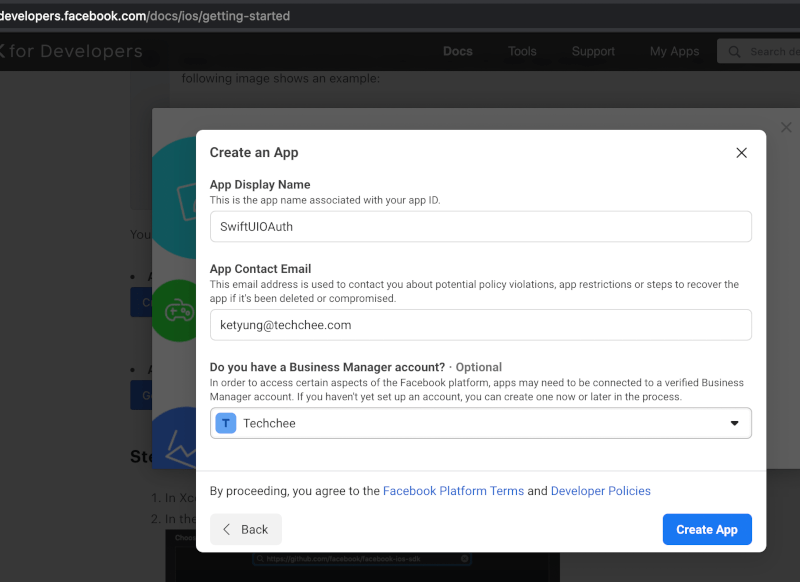
After creating an FB app then go to the app Dashboard and scroll down there to click on Facebook Login setup and then add an iOS app and proceed with the number of steps you’re told to such as adding your app Bundle ID etc.
2. Configure your Xcode Project’s Info.plist – the FB setup instruction also tells you to configure your Info.plist by copying and paste the given XML snippet.
So after doing that, you’ll have the FacebookAppID, FacebookDisplayName, LSApplicationQueriesSchemes and URLSchemes in your Xcode Project’s Info.plist, as shown boxed in red in the screenshot below:

3. Enabling Facebook Login in your Firebase Console Project. Go the Sign-in method of the Authentication tab of your Firebase Project and enable Facebook. And you’ll have to add the App ID and App Secret as the screenshot below:

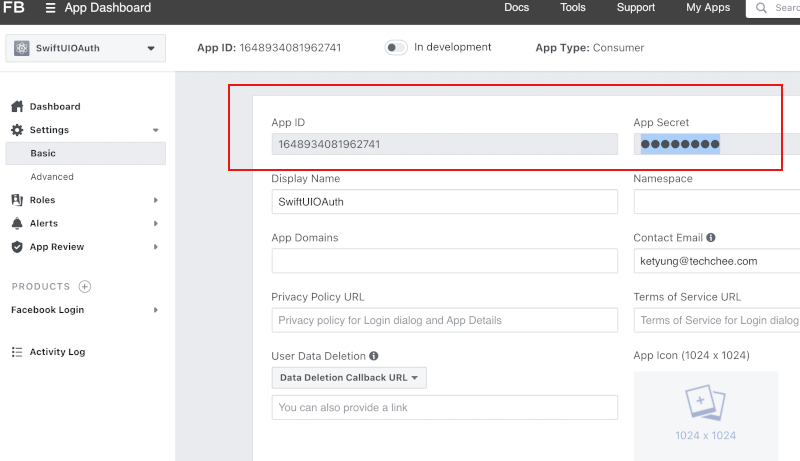
The FB app id and app secret can be obtained from your FB app Dashboard in basic Settings, as shown below. Click to show the app secret and you’re required to enter a password and then copy it and paste it in your Firebase.
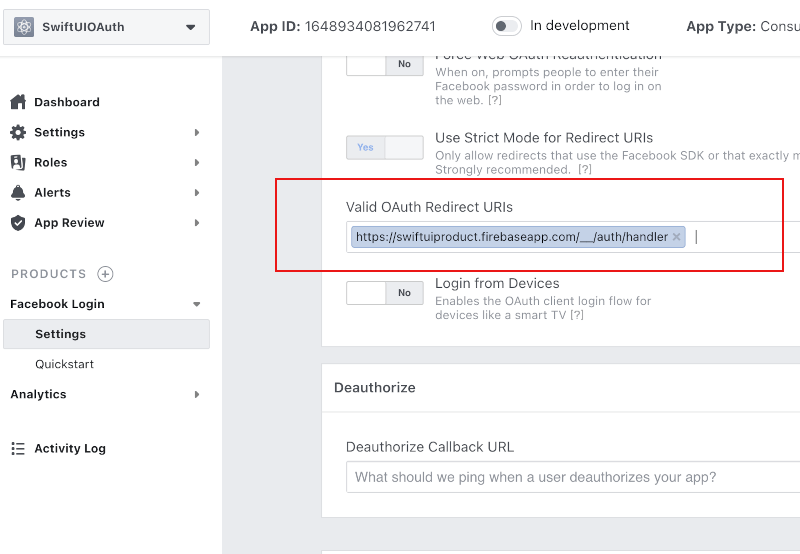
And you’ll also need to copy the OAuth redirect URI in your Firebase, shown in the above picture boxed in red and paste it to your FB app configuration, which can be found at the side menu under Facebook Login -> Settings, as shown below:
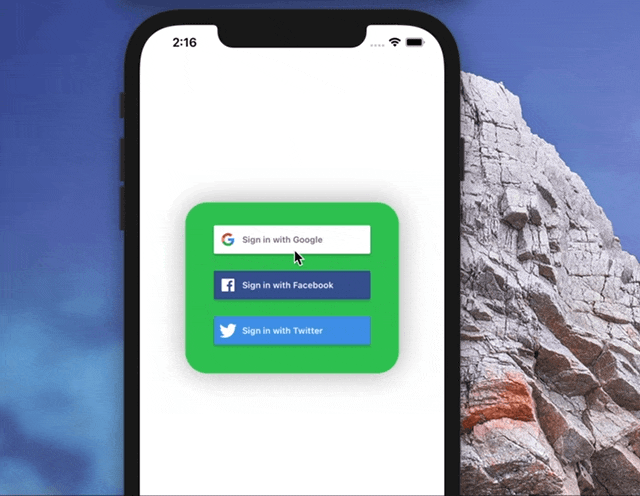
Huh! 😓😓😓😓😓 After all these setups, you app should be able to run without crashing on the iOS simulator or device as below!
That’s all for now. We’ll have another blog post covering how to handle sign in and sign out with our AuthManager with the MVVM pattern later. Stay tuned and happy learning!
One thought on “Add Google OAuth, FB, Twitter sign-in with FirebaseUI in your SwiftUI app”