

Listen to me. It has been a long time since I last updated this blog. I am not going to sugarcoat it or give you a generic excuse – life gets busy. Lately, I have been entirely buried in the trenches of iOS development, managing and maintaining four live apps currently running in the Apple App Store. (You can check out what’s been taking up all my time directly on my homepage at techchee.com).
When you are responsible for keeping multiple live production apps breathing, writing blog articles is usually the first thing that gets pushed to the back burner. But the tech world doesn’t pause just because we are busy. With the latest native capabilities rolled out for iOS 26, Apple has introduced some fantastic tools that directly solve old UI pain points—specifically, native web view integration combined with depth-aware, reflective layout modifiers like .glassEffect().
Below is a quick overview of what makes handling overlays in modern layouts so much cleaner now.
Limitations of Traditional Overlays:
- Requires complex layer math or heavy padding hacks to keep layout elements from clipping
- Static background blurs don’t react visually when content dynamically passes behind them
- Heavy performance cost when trying to render real-time translucency over scrolling web containers
Advantages of iOS 26 Native Glass Structuring:
- Utilizes structural stack layering to completely eliminate manual offset values
- The native
.glassEffect()dynamic modifier handles real-time depth-aware rendering with zero boilerplate - Allows background content like web pages to seamlessly glide behind interactive controls
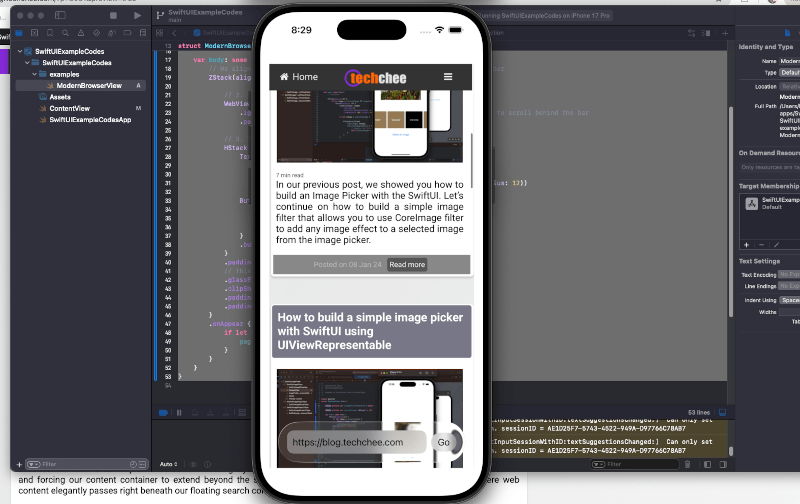
Let’s look at how we can implement a bottom-floating layout using a ZStack. By explicitly anchoring our overlay to the bottom and forcing our content container to extend beyond the safe area edges, we can create a beautiful interface where web content elegantly passes right beneath our floating search controls.
Here is a complete example of how you can build a modern floating browser view:
//
//  WebView.swift
//  SwiftUIExampleCodes
//
//  Created by Chee Ket Yung on 06/07/2026.
//

import SwiftUI
import WebKit

struct ModernBrowserView: View {
    @State private var page = WebPage()
    @State private var urlString = "https://blog.techchee.com"

    var body: some View {
        // We align everything in the ZStack to the bottom to ground our floating bar
        ZStack(alignment: .bottom) {

            // 2. The Content Layer: WebView expands to fill the screen
            WebView(page)
                .ignoresSafeArea(.container, edges: .bottom) // Allows web content to scroll behind the bar
                .padding(.top) // Keep a clean margin at the top

            // 3. The Interactive Layer: Floating Search Bar
            HStack {
                TextField("Search or enter URL", text: $urlString)
                    .textFieldStyle(.plain)
                    .padding(10)
                    .background(.ultraThinMaterial, in: RoundedRectangle(cornerRadius: 12))

                Button("Go") {
                    if let url = URL(string: urlString) {
                        page.load(URLRequest(url: url))
                    }
                }
                .buttonStyle(.glass)
            }
            .padding()
            // This is where the magic happens as content scrolls beneath
            .glassEffect(.clear)
            .clipShape(RoundedRectangle(cornerRadius: 20))
            .padding(.horizontal)
            .padding(.bottom, 10) // Give it a slight lift off the screen edge
        }
        .onAppear {
            if let defaultURL = URL(string: urlString) {
                page.load(URLRequest(url: defaultURL))
            }
        }
    }
}
The magic sauce in the code block above relies entirely on how the container behaves. By attaching .ignoresSafeArea(.container, edges: .bottom) to the WebView, you ensure that the text, layout elements, and graphics render right down to the physical bezel of the phone. When you combine that with the bottom-anchored ZStack alignment and apply .glassEffect(.clear), your interface instantly looks incredibly premium as elements pass beneath it.
No matter how backed up your schedule gets or how many production apps you are juggling, implementing these updated UI paradigms keeps your apps looking incredibly sharp. Stop putting off your layout updates, open up Xcode, and start shipping these cleaner views today! Check out the full source code on GitHub