Stable Diffusion offers a way to generate image from text using AI or machine learning. The SDK is available only in Python at the time of this writing.
To use Stable Diffusion API to generate image from text, all you’ll need to do is first install the following python package using pip.
pip3 install stability-sdk1. Modify the Stable Diffusion example code and turn it into a reusable function
In our example here, we will need to include the very basic function found on the the example code base on Stable Diffusion. We put it into a Python async function and call it gen_image() in our module funcs.py so it can be reused anywhere, as follows:
from stability_sdk import client
import stability_sdk.interfaces.gooseai.generation.generation_pb2 as generation
from PIL import Image
import warnings
import os
import io
from dotenv import load_dotenv

load_dotenv()

async def gen_image( prompt, seed = 1002992 ) :
    os.environ['STABILITY_HOST'] = 'grpc.stability.ai:443'
    os.environ['STABILITY_KEY'] = os.getenv('STABLE_DIFF_API_KEY')

    stability_api = client.StabilityInference(
        key=os.environ['STABILITY_KEY'], # API Key reference.
        verbose=True, # Print debug messages.
        engine="stable-diffusion-v1-5", # Set the engine to use for generation.
        # Available engines: stable-diffusion-v1 stable-diffusion-v1-5 stable-diffusion-512-v2-0 stable-diffusion-768-v2-0
        # stable-diffusion-512-v2-1 stable-diffusion-768-v2-1 stable-inpainting-v1-0 stable-inpainting-512-v2-0
    )

    answers = stability_api.generate(
        prompt= prompt,
        seed= seed , # If a seed is provided, the resulting generated image will be deterministic.
                        # What this means is that as long as all generation parameters remain the same, you can always recall the same image simply by generating it again.
                        # Note: This isn't quite the case for Clip Guided generations, which we'll tackle in a future example notebook.
        steps=30, # Amount of inference steps performed on image generation. Defaults to 30.
        cfg_scale=8.0, # Influences how strongly your generation is guided to match your prompt.
                    # Setting this value higher increases the strength in which it tries to match your prompt.
                    # Defaults to 7.0 if not specified.
        width=512, # Generation width, defaults to 512 if not included.
        height=512, # Generation height, defaults to 512 if not included.
        samples=1, # Number of images to generate, defaults to 1 if not included.
        sampler=generation.SAMPLER_K_DPMPP_2M # Choose which sampler we want to denoise our generation with.
                                                    # Defaults to k_dpmpp_2m if not specified. Clip Guidance only supports ancestral samplers.
                                                    # (Available Samplers: ddim, plms, k_euler, k_euler_ancestral, k_heun, k_dpm_2, k_dpm_2_ancestral, k_dpmpp_2s_ancestral, k_lms, k_dpmpp_2m)
    )


    for resp in answers:
        for artifact in resp.artifacts:
            if artifact.finish_reason == generation.FILTER:
                warnings.warn(
                    "Your request activated the API's safety filters and could not be processed."
                    "Please modify the prompt and try again.")
            if artifact.type == generation.ARTIFACT_IMAGE:
                img_bytes = io.BytesIO(artifact.binary)
                return img_bytes
Please note the above gen_image() has been modified based on the Stable Diffusion example code base, which now has two parameters, which are the text that needs to be provided to generate the image and the seed when provided allowing the generated image to be deterministic i.e. the same image will be generated again when the same text and seed are provided. And it returns an in-memory binary stream of the generated image.
And please note that, we have our API key stored in an .env file, so you’ll need to import load_dotenv and call this function at the beginning of funcs.py. And the API key is obtained by using os.getenv(‘STABLE_DIFF_API_KEY’) as shown in line 9. Storing API KEY on .env file is the recommended way, so you can have .gitignore to exclude your API KEY from publishing on a GitHub repo.
2. Build an REST API by using Fast API.
In order to have our iOS app to call Stable Diffusion to have the image generated by the user’s input text, we’ll need to have our iOS client to call a REST API that will use the gen_image() function to generate the image by the user’s input text and returns the image to the iOS client for display.
In Python, the easier way is to use Fast API. First of all, for a quick guide, to install Fast API, just do as follows:
pip3 install fastapiAnd install uvicorn:
pip3 install "uvicorn[standard]"So, we quickly code up a main.py which has one end point only as follows, and put in the src folder of our project, please also put the above funcs.py file into the src folder as well:
from fastapi import FastAPI
from src.funcs import gen_image
from fastapi import Response

app = FastAPI()

@app.get("/get_image/{text}/{seed}")
async def get_image(text : str, seed : int):
    img =  await gen_image(text,seed)
    return Response(content=img.getvalue(), media_type="image/png")
So in the above code, we need to import the gen_image() function from the “funcs” module. And the REST API has only one end-point /get_image/{text}/{seed}, which the client just needs to provide the text and the seed to generate the image.
Before we proceed to test our REST API, make sure to get an API key from Stable Diffusion’s DreamStudio and create an .env file in the root folder of your FAST API project, which contains the API key that you’ve obtained from DreamStudio, for example as follows:
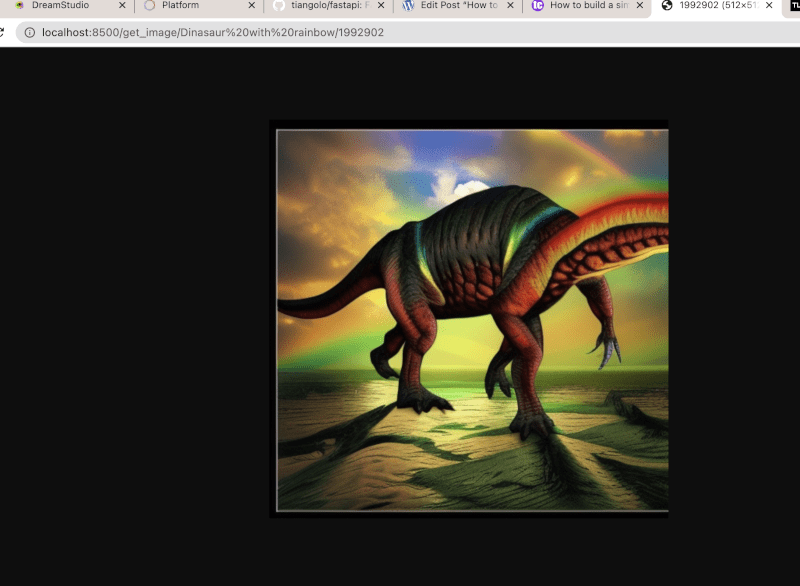
STABLE_DIFF_API_KEY=sk-XXXXXXXXXXXXXXXXXXXXXXXXXXXXXXXXXXLet’s test the REST API to generate some images by text. You can start your REST API now at your console with uvicorn with the following command, such as make it listen to port 8500. Please note our code is in the src folder of the project root, therefore, you’ll need to specify src.main:app with unvicorn.
uvicorn src.main:app --reload --port 8500So, to test our REST API, we can simply open the browser to provide it a text and a seed e.g. “Dinosaur with Rainbow” and one of my results is as follows:
3. Now let’s build our iOS app with SwiftUI
In our tutorial, we are going to build a simple iOS app which presents a ContentView that provides a TextEditor and TextField for the user to input some text and the seed respectively and to be constructed as an image url to send to the REST API.
And the image is displayed by using AsyncImage, that has been available since iOS 15.
The ContentView
The code for the ContentView is as follows, which basically has a VStack that vertically stacks the imageView(), the TextEditor for inputing the text, the TextField for inputing the seed and a button when tapped, will construct an image URL set to the @State imageUrl variable to be consumed by the AsyncImageView.
We also have a @State loading variable which is set to true when the “Generate Image” button is tapped. When it is set to true, the Button will be disabled to prevent the user from tapping the Button again. And this @State loading variable is passed to the AsyncImageView as a Binding variable, which will be set to false upon the completion of the AsyncImage loading, thus re-enabling the Button.
struct ContentView: View {

    @State private var text : String = ""

    @State private var seed : String = ""

    @State private var loading : Bool = false

    @State private var imageUrl : URL?

    var body: some View {

          VStack(alignment: .leading, spacing:10) {
            imageView()

            VStack(alignment: .leading,  spacing:2) {
                Text("Your text here:")
                TextEditor(text: $text)
                .lineLimit(3)
                .frame(height:50)
            }

            VStack(alignment: .leading,  spacing:2) {
                Text("Seed :")
                TextField("Seed", text: $seed)
                .keyboardType(.numberPad)
            }

            Button(action: {
                genImage()
            }){
                Text("Generate Image")
            }
            .disabled(self.processing)

            Spacer()
        }
        .padding()
    }
}
The imageView() is a function that has a HStack which aligns the AsyncImageView at the center with Spacer at both right and left.
extension ContentView {

    private func imageView () -> some View {
        HStack {
            Spacer()
             AsyncImageView(imageUrl: imageUrl, loading: $loading)
            .frame(width:250, height:250)
            Spacer()
        }
    }
}
We build an AsyncImageView as follows, which can be reused when needed. The AsyncImageView is provided a @Binding loading variable that can be set to false when the AsyncImage has completed loading and an optional imageUrl property.
struct AsyncImageView : View {
    var imageUrl : URL?
    @Binding var loading: Bool

    var body: some View {
        imageView()
    }
}

extension AsyncImageView {

    @ViewBuilder
    private func imageView () -> some View {

        if let imgUrl = self.imageUrl {

            AsyncImage(url:imgUrl ) { phase in

                switch phase {
                    case .empty:
                        ProgressView()
                    case .success(let image):
                        image.resizable()
                        .aspectRatio(contentMode: .fit)
                        .onAppear{
                            self.loading = false
                        }
                    case .failure(let err):
                        VStack(spacing:4) {
                            Image(systemName: "exclamationmark.circle.fill")
                            .foregroundColor(.red)
                            Text("Error : \(err.localizedDescription)")
                        }
                        .onAppear{
                            self.loading = false
                        }
                    @unknown default:
                        Text("Unknown state!")
                        .foregroundColor(.blue)
                        .onAppear{
                            self.loading = false
                        }
                }
            }
        }
        else {

            Image(systemName: "photo.fill")
            .resizable()
            .aspectRatio(contentMode: .fill)
            .opacity(0.3)

        }
    }

}
The AsyncImageView has a @ViewBuilder function, imageView() which returns a static SwiftUI Image view only if the URL provided is nil or invalid, just to fill up the space else it’ll return the SwiftUI AsyncImage. The AsyncImage is created by the 3rd initializer which provides a content closure of phase value (AsyncImagePhase) at different point.
A switch statement is used to return different SwiftUI View at different state of phase, such as a ProgressView is returned when its state is .empty, an error view when it’s on error and also the SwiftUI Image view with the loaded image on success. Please note that, we set the @Binding loading variable passed by the parent view to false on each state when the View has successfully appears except the .empty while it’s still loading.
Finally the genImage() function, which generally sets the loading variable to true and set the image URL by concatenating with the text and seed is as follows:
extension ContentView {
    private func genImage(){

        if (text != "" && seed != ""){
            self.imageUrl = nil
            DispatchQueue.main.asyncAfter(deadline: .now() + 0.5) {

                if let imgUrl = URL(string: "http://localhost:8500/get_image/\(text.urlEncoded ?? "")/\(seed.urlEncoded ?? "")") {
                    self.loading = true
                    self.imageUrl = imgUrl
                }
            }
        }
    }
}
Please also note that the above text and seed must be url encoded, which can be done by a String extension as follows:
private let urlAllowed: CharacterSet =
    .alphanumerics.union(.init(charactersIn: "-._~")) // as per RFC 3986

extension String {
    var urlEncoded: String? {
        return addingPercentEncoding(withAllowedCharacters:urlAllowed )
    }
}
The result is as follows, when run on an iOS simulator. (Click the image below to view the animated GIF on how it works.)