
Using the Serum’s Anchor framework to develop smart contract in Rust for the Solana blockchain is a much simpler approach than any other methods, especially when handling serialising and deserialising the data on-chain and adding some constraints for security checking etc.
Without too much saying, let’s get started how you can develop a simple Rust smart contract that allows you to store some data on chain.
This tutorial assumes that you already have the necessary packages installed including Rust, Solana CLI, yarn and Anchor. If you don’t have, head over here to get the installations done!
Ok, first check your Anchor version by typing in terminal as follows:
anchor --versionTo start an Anchor project, then do the following in terminal.
anchor init my_sol_dataThe above command will create a project folder “my_sol_data” which contains all the basic files for you to get started, as follows:
And also the source of your Rust program in the folder programs/my_sol_data/src/. A lib.rs will be generated by Anchor to get you started.
The program architecture of Anchor should come as follows:
For this simple tutorial, in order to keep our code more organised and clean, we are going to store the accounts, the account contexts and the processor on three separate files, which are state.rs, ins.rs and lib.rs respectively.
Program Account – state.rs
The MyData struct as below, which is a Rust struct to store the a number which is type u8 (unsigned 8-bit integer which max value is 255 only), a message of String type and the owner field which stores the wallet’s public key of the signer or owner of the data, as follows:
use anchor_lang::prelude::*;

#[account]
pub struct MyData {
    pub number : u8,
    pub message : String,
    pub owner : Pubkey,
}
Please note the above MyData struct is marked with the #[account] macro, indicating it’s an account owned by the program.
The Instruction Wrappers – ins.rs
In the ins.rs file, we have on two instruction wrappers as follows, they are basically Rust structs that are marked with the derived macros #[derive(Accounts)].
use anchor_lang::prelude::*;
use crate::state::MyData;

#[derive(Accounts)]
pub struct InitMyData<'info> {

    #[account(init, payer = owner, space = 8 + 1 + 50 + 32)]
    pub data : Account<'info, MyData>,

    pub owner : Signer<'info>,

    pub system_program : Program<'info, System>,
}

#[derive(Accounts)]
pub struct UpdateMyData<'info> {

   #[account(mut,has_one=owner)]
   pub data : Account<'info, MyData>,

   pub owner : Signer<'info>,
}
The InitMyData is the instruction wrapper meant for initialising the account for storing MyData. Please note that it’s marked with the #[account(…)] macro with three attributes : “init” indicates it’ll be initialised and the payer is the “owner” which is the signer of the instruction.
And the last attribute “space” specifies the space required for the account to store MyData. 8 + 1 + 50 + 32, the preceding 8 bytes is the account discriminator required by Anchor. 1 byte is for the number, 50 bytes for the message. (So, a message longer than 50 bytes will throw an error!) and another 32 bytes for the owner’s wallet public key.
The UpdateMyData is the instruction wrapper which passes in the MyData account for updating its data. Please note that it’s marked with the #[account(mut,has_one=owner)] attribute, indicating it’s mutable (or writable) and has a constraint checking that its “owner” field must match the signer of the instruction i.e. only the one who initialised it is able to update it.
Please note that the two instruction wrapper structs are marked with the derived macro #[derive(Accounts)] for accounts that must be specified for a given instruction.
More info about the #[drive(Accounts)] macro, and setting the constraints and other attributes of #[account(…)] can be found here.
Processor – lib.rs
This is the entry point of the program which is marked with #[program] macro. It contains the corresponding RPC handlers for initialising the data and updating the data, as follows:
pub mod ins;
pub mod state;

use anchor_lang::prelude::*;
use instructions::*;
//replace the program id that you get after deploying the program
declare_id!("Fg6PaFpoGXkYsidMpWTK6W2BeZ7FEfcYkg476zPFsLnS");

#[program]
pub mod my_sol_data {
    use super::*;
    pub fn init_data(ctx: Context<InitMyData>) -> ProgramResult {

        let acc = &mut ctx.accounts.data;
        acc.number = 0;
        acc.message = String::from("MyData initialized!");

        // we store the public key of the signer to the owner field
        // of MyData
        acc.owner = ctx.accounts.owner.key();

        Ok(())
    }

    pub fn update_data (ctx : Context<UpdateMyData>, number : u8, message : String) -> ProgramResult {

        let acc = &mut ctx.accounts.data;
        acc.number = number;
        acc.message = message;

        Ok(())
    }
}
In the above two instructions or RPC handlers, the init_data and update_data, each has the corresponding Context, InitMyData and UpdateMyData as the first parameter. So, you can easily access the account you want such as getting the account for storing the MyData, you just need to refer to ctx.accounts.account_variable_name e.g ctx.accounts.data in our case here.
So, up to here, you can compile your Rust smart contract by the following command.
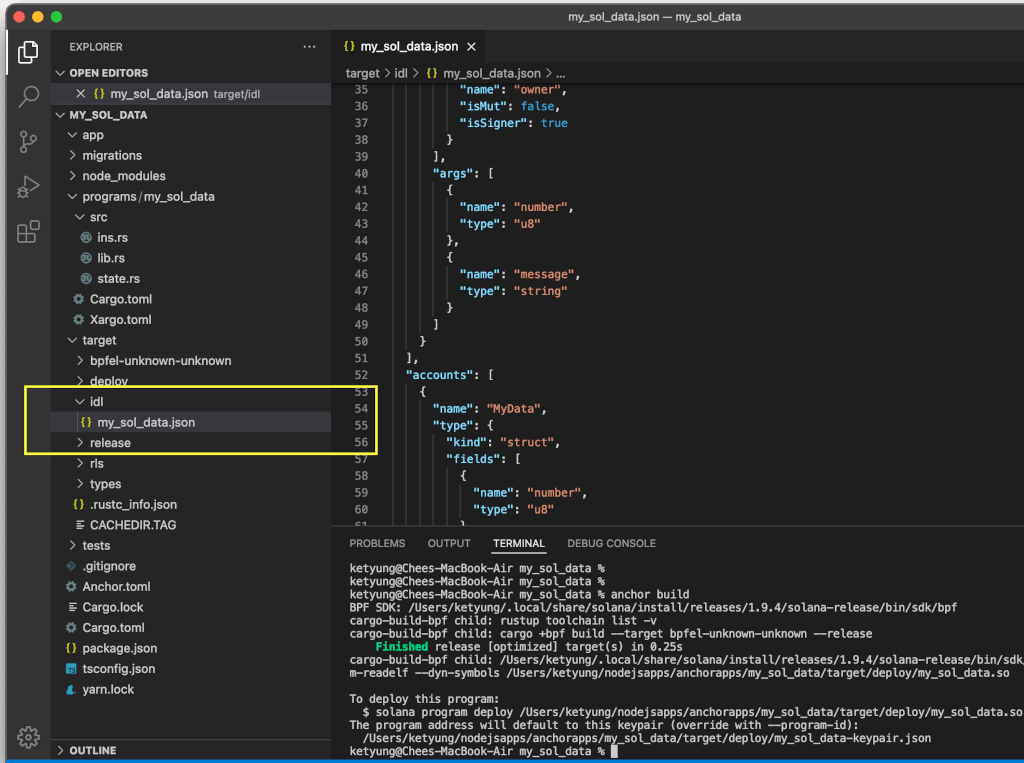
anchor buildAfter you’ve built, it should have generated an IDL (Interface description language) file – my_sol_data.idl which is located in folder target/idl.
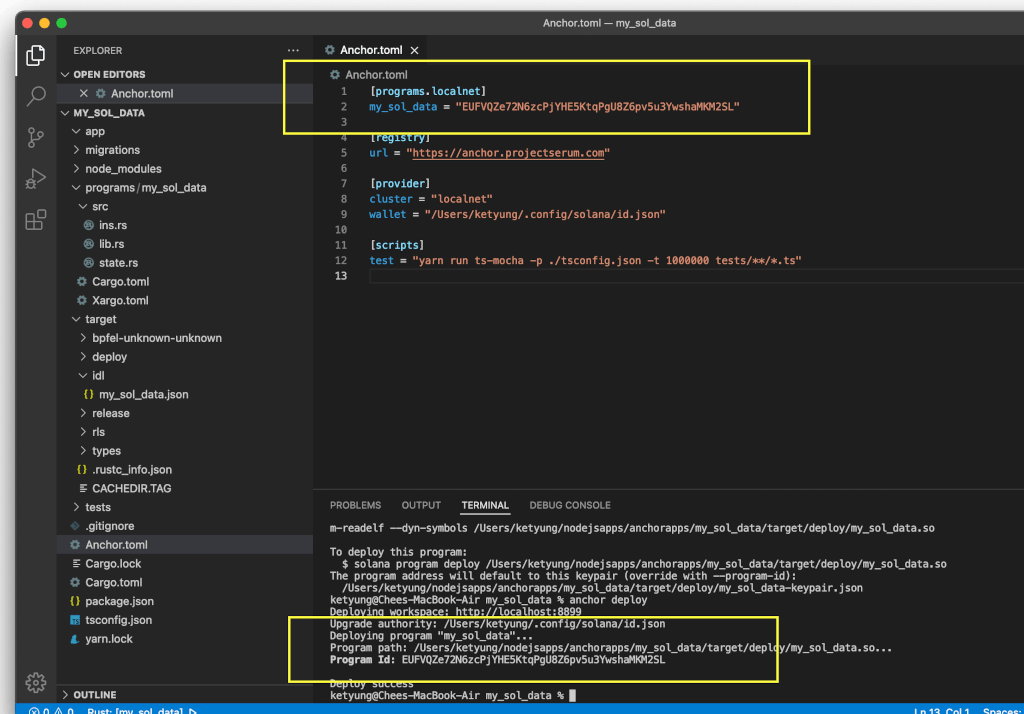
Now you can deploy your program and then write some web 3 testers in TypeScript or JavaScript to test your program. To deploy it, just type “anchor deploy” in the terminal of your project folder. By default this will deploy to your local cluster (localnet).
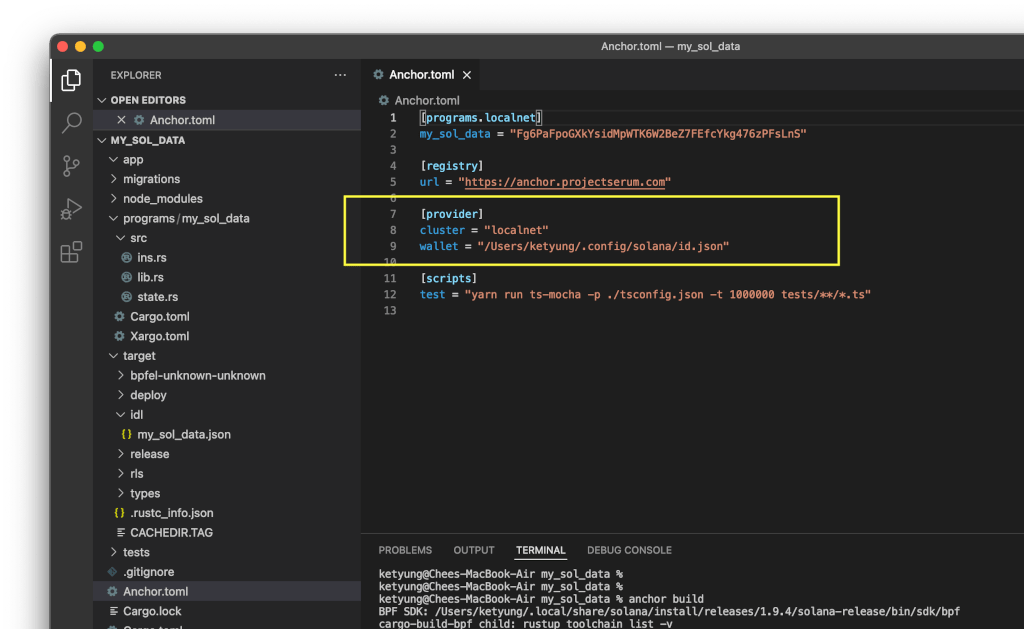
anchor deployYou can change to other clusters such as the devnet in the Anchor.toml, just replace the value of cluster “localnet” by devnet as below (boxed in yellow):
If you want to proceed to localnet cluster, you must ensure your local cluster is up and running. If it’s not running yet, just run it with the CLI command:
solana-test-validatorAnd also make sure you’ve got your Solana file system wallet setup. If no, you’ll need to create one by the following CLI command:
solana-keygen newAfter you’ve successfully deployed, you’ll be given a program ID, just copy and replace this program ID in Anchor.toml for the value of “my_sol_data” (as below) and also in the declare_id! macro in your lib.rs (line 7). And you’ll need to rebuild and re-deploy the program.
Now, write the testers in TS or JS to test your Rust program
In the “tests” folder, which you can write your test in Web 3 by TypeScript Or JavaScript. There is already a template generated by Anchor, which you can easily get started to write your own tests.
So, for testing our processor RPC handlers init_data and update_data respectively, the anchor’s RPC calls to both the two handlers are as follows:
import * as anchor from '@project-serum/anchor';
import { Program } from '@project-serum/anchor';
import { MySolData } from '../target/types/my_sol_data';

describe('my_sol_data', () => {

  // Configure the client to use the local cluster.
  let provider = anchor.Provider.env();
  anchor.setProvider(provider);
  const program = anchor.workspace.MySolData as Program;

  let myDataAccountSigner = anchor.web3.Keypair.generate();
  let myDataAccountAddress = myDataAccountSigner.publicKey;

  it('Initialize MyData!', async () => {
    // Add your test here.
    const tx = await program.rpc.initData(
      {
          accounts : {
            data : myDataAccountAddress,
            owner : provider.wallet.publicKey,
            systemProgram : anchor.web3.SystemProgram.programId,
          },
          signers : [myDataAccountSigner],
      }
    );
    console.log("Your transaction signature", tx);
    printMyData(myDataAccountAddress, program);
  });

  it('Update MyData!', async () => {
    // generate a random number <= 255
    const rnd = Math.floor(Math.random() * 255);
    const message = "Updated number is :" +rnd;
    const tx = await program.rpc.updateData(rnd, message,
      {
          accounts : {
            data : myDataAccountAddress,
            owner : provider.wallet.publicKey,
          }
      }
    );
    console.log("Your transaction signature", tx);
    printMyData(myDataAccountAddress, program);
  });
});
We also prepare a printMyData function as below, which fetches the MyData account and prints each of its field to the console, allowing you to check the data stored on chain after each RPC call.
async function printMyData (myDataAccAddress : anchor.web3.PublicKey , program : Program){

   const myDataAcc = await program.account.myData.fetch(myDataAccAddress);
   console.log("Data of account:", myDataAccAddress.toBase58());
   console.log("Number :", myDataAcc.number.toString() );
   console.log("Message :", myDataAcc.message);
   console.log("Owner :", myDataAcc.owner.toBase58());
}
And run your test by the command :
anchor testThat's all for now. The complete source code of this tutorial is available on GitHub.