In SwiftUI, a screen must have a NavigationView in order for it to be able to push to another screen. For example in the diagram below, Screen 1 contains a NavigationLink embedded in a NavigationView, will push to Screen 2 when tapped. And Screen 2 also has a NavigationLink, will push to Screen 3 when tapped.
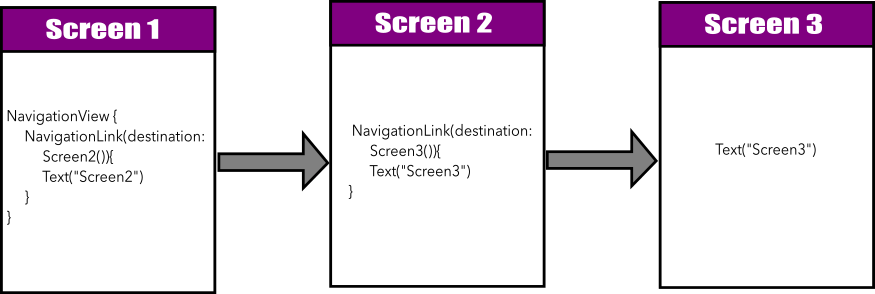
So, in order for Screen 1 to be able to push to Screen 2 when the user taps on the NavigationLink, it must have a NavigationView. While Screen 2 shouldn’t have a NavigationView although it has a NavigationLink to push to Screen 3.
The code for Screen 1, Screen 2 and Screen 3 are as follows. In the code below, we use the convenient static method Theme.navigationBarColors to set the navigation bar background color and title text color. And use the custom modifier navigation(title:) to set the title of the screen (instead of the built-in modifier) from our previous tutorial.
Code for Screen 1:
struct Screen1 : View {
   init(){
      Theme.navigationBarColors(background: .purple, titleColor: .white)
   }

   var body : some View {
      NavigationView {
         NavigationLink(destination: Screen2()){
             Text("Screen 2")
         }
         .navigation(title: "Screen 1")
      }
   }
}
Code for Screen 2:
struct Screen2 : View {
    var body: some View {
        NavigationLink(destination: Screen3()){
            Text("Screen 3")
        }
        .navigation(title: "Screen 2")
    }
}
Code for Screen 3:
struct Screen3 : View {
    var body: some View {
        Text("Screen 3")
        .navigation(title: "Screen 3")
    }
}
The result is as below, when it’s run.
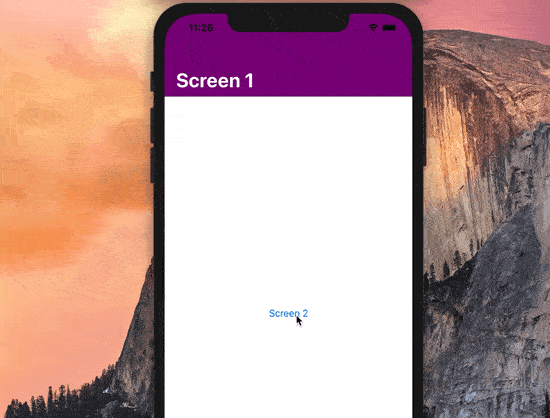
Please note that in the above, Screen 2 does not have a NavigationView although it has a NavigationLink – when tapped will push to Screen 3.
What if we put a NavigationView for Screen 2 as below?
struct Screen2 : View {
    var body: some View {
       NavigationView {
          NavigationLink(destination: Screen3()){
             Text("Screen 3")
          }
          .navigation(title: "Screen 2")
       }
    }
}
It’ll result double NavigationView and double navigation bar as below, which is what we do not want!
So in our example here, for Screen 2, we do not want it to have a NavigationView when it’s to be pushed on to the navigation stack from another screen.
But, we’ll want it to have a NavigationView when it’s presented modally or as an entry point of navigation somewhere else in your app – so it has the navigation capabilities and can push to Screen 3.
So, how do we do that? We don’t want to write another separate screen, which has exactly the same functionality with the only difference is how it’s presented elsewhere in your app.
A custom modifier withNavigationView() will come in rescue!
struct WithNavigationViewWrapperModifier : ViewModifier {
    var withNavigationView : Bool

    init(withNavigationView : Bool, backgroundColor : UIColor? = nil,
    titleColor : UIColor? = nil , tintColor : UIColor? = nil)
    {
        self.withNavigationView = withNavigationView
        if ( withNavigationView ){

            Theme.navigationBarColors(background: backgroundColor ?? .clear , titleColor:
            titleColor ?? black, tintColor:  tintColor)
        }

    }

    @ViewBuilder
    func body(content: Content) -> some View {
        if (withNavigationView){
            NavigationView {
                content
            }
            .navigationViewStyle(StackNavigationViewStyle())
        }
        else {
            content
        }
    }
}
The above custom modifier simply wraps any View with the NavigationView when the boolean variable withNavigationView is true and it takes the opportunity to set the background color, title color and tint color if they’re provided, else will be defaulted to clear and black colors respectively.
Please also take note in the above NavigationView is set with a navigationStyle of StackNavigationViewStyle. This style is to tell SwiftUI that we want only to show one view in a navigation instead of showing view side by side.
If a NavigationView is not set with the StackNavigationViewStyle, views will be shown side by side in a landscape mode on an iPhone simulator as below:
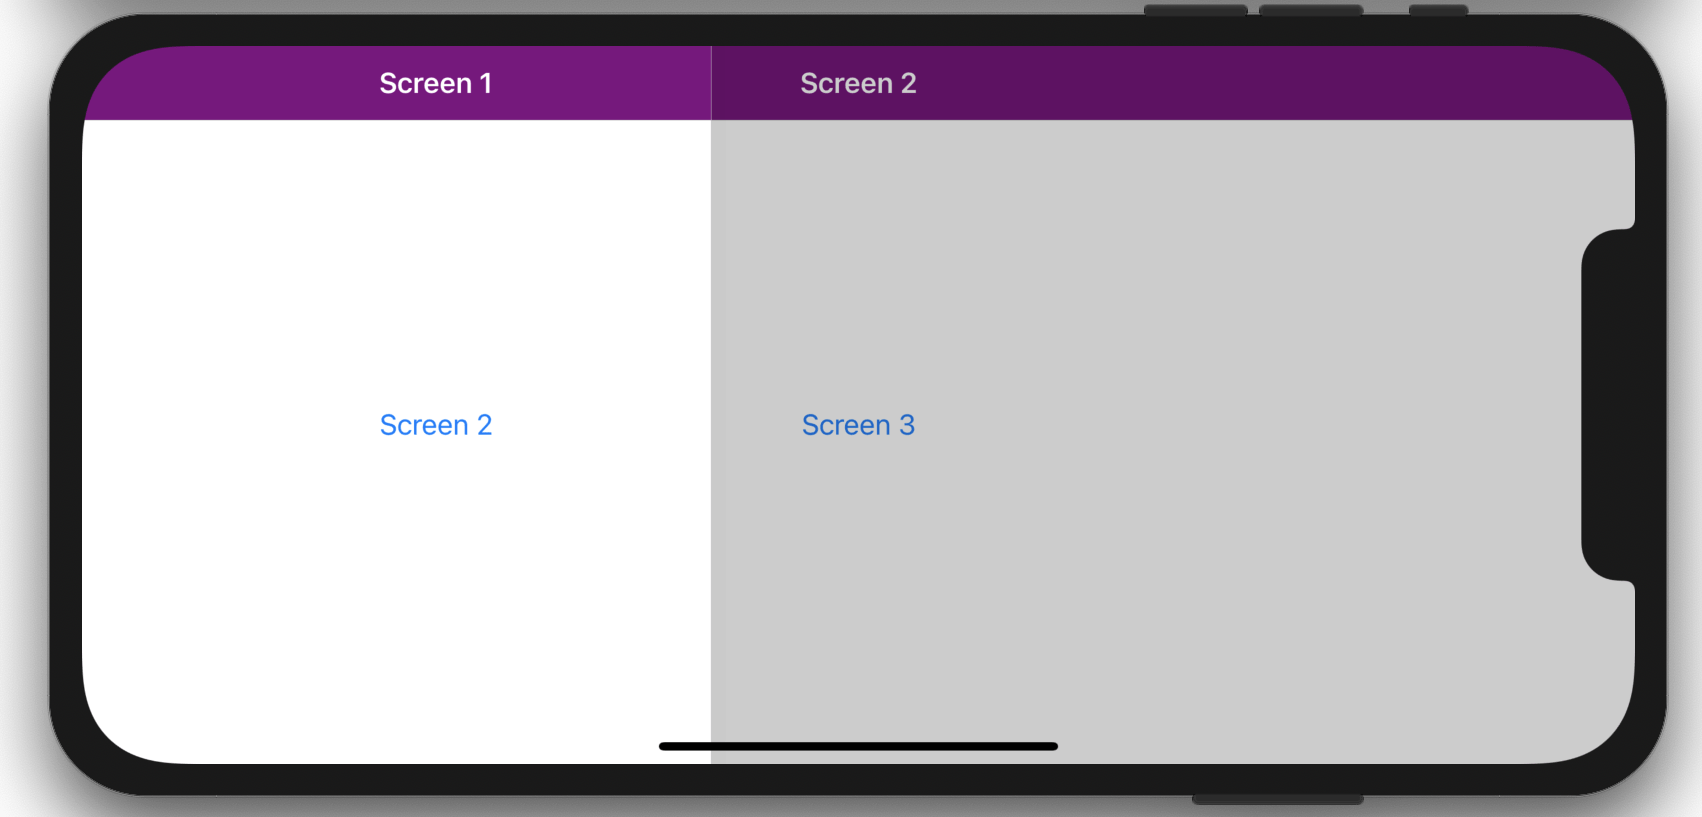
The StackNavigationViewStyle also suppresses the warning message of “displayModeButtonItem is internally managed and not exposed for DoubleColumn style”, which will happen in our example here when Screen 2 is pushed to Screen 3.
And now we have the following handy extension function of View, which can be used by any View to have or have not NavigationView dependent on the boolean value of the first parameter, while the rest of the parameters are meant for setting the colors.
extension View {
    func withNavigationView (_ with : Bool,
    backgroundColor : UIColor? = nil, titleColor : UIColor? = nil ,
    tintColor : UIColor? = nil) -> some View {

        self.modifier( WithNavigationViewWrapperModifier(withNavigationView: with,
        backgroundColor: backgroundColor, titleColor: titleColor,
        tintColor:  tintColor))

    }
}
So, now we rewrite our code for Screen 2 so it can be reused either with or without a NavigationView, by using the withNavigationView custom modifier as follows:
struct Screen2 : View {
    var hasNavigation : Bool = false

    var body: some View {

        NavigationLink(destination: Screen3()){
            Text("Screen 3")
        }
        .navigation(title: "Screen 2")
        .withNavigationView(hasNavigation,
            backgroundColor: .blue,
            titleColor: .white)
    }
}
In the above Screen 2, the custom modifier will set it to have NavigationView with background color blue and title color white when the instance variable hasNavigation is true.
By default, the hasNavigation variable is false, so when it’s instantiated without specifying its value, then Screen 2 will not have a NavigationView – which is what we need when pushed from Screen 1 to Screen 2.
Please take note the custom modifier withNavigationView() must be used after any modifier (built-in or custom) that sets the title of the navigation bar.
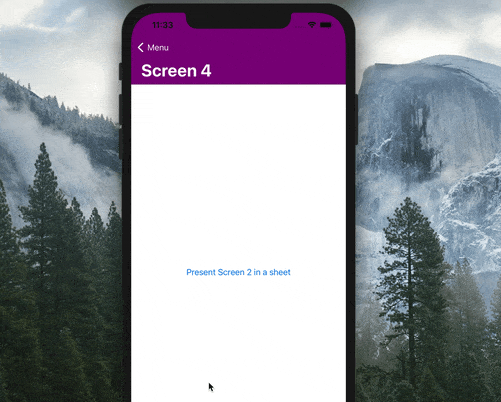
In the case when we want to present Screen 2 modally, for example in our example Screen 4 below, which a tap of a button will present Screen 2 in a sheet or modally. Then we’ll want Screen 2 to have a NavigationView, so it can push to Screen 3 when user taps on the NavigationLink on it. Therefore, Screen 2 is instantiated with the withNavigationView set to true.
struct Screen4 : View {
    @State private var showScreen2 : Bool = false

    var body: some View{

        Button(action: {
            self.showScreen2.toggle()
        }
        , label: {
            Text("Present Screen 2 in a sheet")
        })
        .sheet(isPresented: self.$showScreen2, content: {
            Screen2(hasNavigation: true)
        })
        .navigation(title: "Screen 4")
    }
}
The result is as follows, when run on an iPhone simulator :
To wrap up – with such a handy custom modifier, we can build reusable screens with or without NavigationView when needed and use them in anywhere of your app or some other apps. That’s all for now. Hope you enjoy this tutorial and happy learning.
The complete source code of this and previous tutorials of navigation in SwiftUI can be found on GitHub