There are two types of notifications in iOS app, the local and remote notifications. The local notification is a handy way for you to send notifications right away from the app to the users without having to do it from the server side.
To send local notifications in your app, all you need to do is to make use of the UserNotifications framework. First of all, you’ll need to import the UserNotifications as below:
import UserNotificationsThe Swift code for sending a local notification after 5 seconds is as follows:
let content = UNMutableNotificationContent()
content.title = "Take a break"
content.subtitle = "Please stop working now"
content.sound = UNNotificationSound.default

let trigger = UNTimeIntervalNotificationTrigger(timeInterval: 5, repeats: false)

let request = UNNotificationRequest(identifier: "com.techchee.notif.id", content: content,
   trigger:trigger)

UNUserNotificationCenter.current().add(request)
Basically, the above code simply instantiates a UNMutableNotificationContent, which is the content of your notification message, so we need to supply it with the title, subtitle and the sound.
And it then instantiates a UNNotificationRequest with an identifier and a trigger which is an instance of UNTimeIntervalNotificationTrigger that has parameters of the trigger should kick off after the specified number of seconds have passed and whether it should repeat itself.
Please note that the trigger parameter required by the UNNotificationRequest is an abstract class of UNNotificationTrigger. There are some other concrete classes that come with the framework for the handiness of scheduling notifications.
For example the UNCalendarNotificationTrigger, which lets you schedule a notification at a specified date and time – by creating the required DateComponents, as below, which creates a trigger that will fire every day at 9:15 AM.
var date = DateComponents()
date.hour = 9
date.minute = 15
let trigger = UNCalendarNotificationTrigger(dateMatching: date, repeats: true)
And lastly, we add the notification request to the notification center and that’s all.
Request for notification permission in your app
In order to be able to send and receive local or remote push notifications in your app, your app will need to have somewhere asking for the permission from the users to allow for notifications.
Thus, we have the following code checking if the permission of sending notification is granted. If it is not, we’ll request for the permission.
let center = UNUserNotificationCenter.current()
center.getNotificationSettings(completionHandler: { settings in
    if settings.authorizationStatus != .authorized {
        // request for notification permissions for alert, sound and badge
        center.requestAuthorization(options: [.alert, .sound, .badge]) {
           granted, error in

           if let error = error {
                // handle the error here
                print("error : \(error)")
           }
        }
    }
})
Basically, in the above code, we invoke the getNotificationSettings method of the current notification center. It’ll provide a completion handler block with the settings which can then be checked for its authorizationStatus.
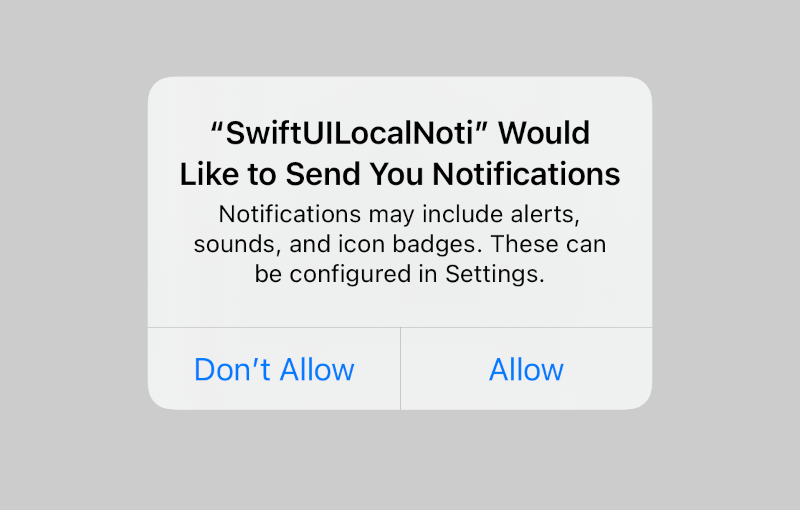
If the authorizationStatus is not authorized, we’ll invoke the requestAuthorization method with alert, sound and badge. This will present the following “asking for notification permission prompt” to the user and be waiting for the user to respond.
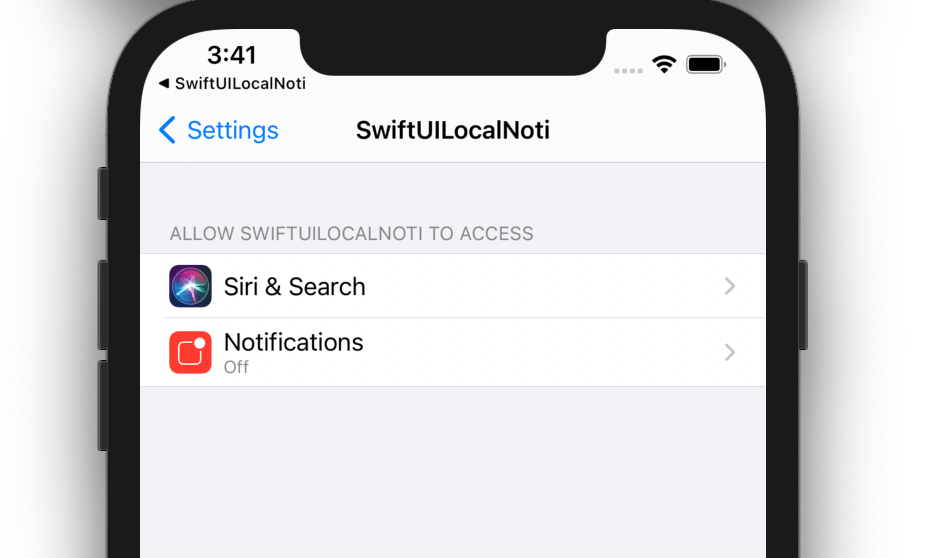
You may also want to check for the authorizationStatus if it is denied, which means the user has disabled notification for the app in his or her device’s settings. So, we can add the check of if it’s denied just before checking if it’s authorized as follows:
if settings.authorizationStatus == .denied {
     // do something such as presenting
     // an alert to tell the user that
     // it's disabled and lead the user to
     // the device Settings to enable it
     return
}
Usually an app will show an alert message of the notification has been disabled and lead the user to the device’s Settings to enable it as follows:

Implement the UNUserNotificationCenterDelegate
In order to handle the received notifications in your app, you’ll need a class that implements the UNUserNotificationCenterDelegate. The two crucial methods for handling the notifications when your app is in the background and foreground are :
- userNotificationCenter(_:didReceive:withCompletionHandler:)
- userNotificationCenter(_:willPresent:withCompletionHandler:)
respectively
Implement the UNUserNotificationCenterDelegate with AppDelegate
Usually, we’ll implement the UNUserNotificationCenterDelegate in our AppDelegate.
In the AppDelegate’s application(_:didFinishLaunchingWithOptions:) method, it requests for the user’s permission and sets itself as the UNUserNotificationCenterDelegate :
class AppDelegate: UIResponder, UIApplicationDelegate {

    var window: UIWindow?

    func application(_ application: UIApplication, didFinishLaunchingWithOptions launchOptions:
    [UIApplication.LaunchOptionsKey: Any]?) -> Bool {
          // request for the permission
          let center = UNUserNotificationCenter.current()
          center.delegate = self
          center.getNotificationSettings(completionHandler: { settings in
            if settings.authorizationStatus == .authorized  {
                print("permission granted")
            }
         })
         return true
    }
    ...
    ...
}
AppDelegate implements the UNUserNotificationCenterDelegate as follows:
extension AppDelegate : UNUserNotificationCenterDelegate{

    /** Handle notification when the app is in background */
    func userNotificationCenter(_ center: UNUserNotificationCenter, didReceive response:
    UNNotificationResponse, withCompletionHandler completionHandler: @escaping () -> Void) {

        // handle the notification here
        ...
    }

    /** Handle notification when the app is in foreground */
    func userNotificationCenter(_ center: UNUserNotificationCenter,
             willPresent notification: UNNotification,
             withCompletionHandler completionHandler:
                @escaping (UNNotificationPresentationOptions) -> Void) {

        // handle the notification here..
        ...
    }
}
And to use the AppDelegate in your SwiftUI app entry point, you need the @UIApplicationDelegateAdaptor property wrapper as follows:
@main
struct SwiftUILocalNotificationsApp: App {
    @UIApplicationDelegateAdaptor(AppDelegate.self) var appDelegate

    var body: some Scene {
        WindowGroup {
            ContentView()
        }
    }
}
Implement the UNUserNotificationCenterDelegate without AppDelegate in SwiftUI
But what if you do not want to use AppDelegate in your SwiftUI app? You can create a class to implement it which will come in handy as the following.
Let’s create a class and call it NotificationHandler and implement the two methods of UNUserNotificationCenterDelegate as follows:
class NotificationHandler : NSObject, UNUserNotificationCenterDelegate{
    static let shared = NotificationHandler()

    /** Handle notification when app is in background */
    func userNotificationCenter(_ center: UNUserNotificationCenter, didReceive response:
        UNNotificationResponse, withCompletionHandler completionHandler: @escaping () -> Void) {

        let notiName = Notification.Name(response.notification.request.identifier)
        NotificationCenter.default.post(name:notiName , object: response.notification.request.content)
        completionHandler()
    }

    /** Handle notification when the app is in foreground */
    func userNotificationCenter(_ center: UNUserNotificationCenter, willPresent notification: UNNotification,
             withCompletionHandler completionHandler: @escaping (UNNotificationPresentationOptions) -> Void) {

        let notiName = Notification.Name( notification.request.identifier )
        NotificationCenter.default.post(name:notiName , object: notification.request.content)
        completionHandler(.sound)
    }
}
The above two methods simply create a notification event with the name as the identifier and the object as the content of the received local notification and post it to the notification center.
We’ll show you how the events in notification center can be monitored by the built-in onReceive modifier of SwiftUI View with a named Combine publisher later down to this post.
The NotificationHandler also has a static constant “shared” – a singleton for the convenience of sharing it.
And we also include two convenient methods in our NotificationHandler :
-
The requestPermision(_:onDeny) is for requesting permission for sending and receiving notification.
The first parameter is an optional delegate and it will set the delegate of the UNUserNotificationCenter as itself if it’s not provided.
The second parameter is an optional closure onDeny, which lets you have option to pass in a closure for handling it when the notification is not enabled in the user’s device settings.
extension NotificationHandler  {
    func requestPermission(_ delegate : UNUserNotificationCenterDelegate? = nil ,
        onDeny handler :  (()-> Void)? = nil){  // an optional onDeny handler is better here,
                                                // so there is an option not to provide one, have one only when needed
        let center = UNUserNotificationCenter.current()

        center.getNotificationSettings(completionHandler: { settings in

            if settings.authorizationStatus == .denied {
                if let handler = handler {
                    handler()
                }
                return
            }

            if settings.authorizationStatus != .authorized  {
                center.requestAuthorization(options: [.alert, .sound, .badge]) {
                    _ , error in

                    if let error = error {
                        print("error handling \(error)")
                    }
                }
            }

        })
        center.delegate = delegate ?? self
    }
}
- The addNotification(id: title: subtitle:) basically creates notification request with the given id, title and subtitle. And with default sound and send it once after 5 seconds have passed if it’s not specified.
- We also have a method removeNotifications(_:), which will come in handy for the removal of all delivered or pending notifications with the specified IDs.
extension NotificationHandler {
    func addNotification(id : String, title : String, subtitle : String ,
    sound : UNNotificationSound = UNNotificationSound.default,
    trigger : UNNotificationTrigger =
    UNTimeIntervalNotificationTrigger(timeInterval: 5, repeats: false)) {

        let content = UNMutableNotificationContent()
        content.title = title
        content.subtitle = subtitle

        content.sound = sound

        let request = UNNotificationRequest(identifier: id, content: content, trigger: trigger)

        UNUserNotificationCenter.current().add(request)
    }

    func removeNotifications(_ ids : [String]){
        UNUserNotificationCenter.current().removeDeliveredNotifications(withIdentifiers: ids)
        UNUserNotificationCenter.current().removePendingNotificationRequests(withIdentifiers: ids)
    }

}
SwiftUI onReceive modifier to receive Combine event
The SwiftUI View comes with a built-in modifier onReceive, which can detect data emitted by any built-in publisher or any custom Combine publisher.
Such as the following code is an example of a VStack with its onReceive modifier to listen to a NotificationCenter publisher with a given name.
let notiName = "com.techchee.test.notification"
let pub = NotificationCenter.default.publisher(
                   for: Notification.Name(notiName))
VStack{
     ...
}
.onReceive(pub){ data in
     // execute other methods when the
     // Combine publisher with the specified
     // name received
     if let content = (data.object as? UNNotificationContent){
         print("title:\(content.title), subtitle:\(content.subtitle)")
     }
}
...
The onReceive takes two parameters, the first parameter is the publisher and the second parameter is the action that you need to perform upon receiving the event by the publisher.
In the block of the onReceive, we simply check if it’s of type UNNotificationContent and print the title and subtitle in the console for simplicity. In reality, you’ll need to handle it with more complexity such as showing some views etc.
Let’s test if it works. We need to send notification somewhere in our app. Let’s simply add a button inside the VStack so when it’s tapped, it’ll invoke the addNotification method of the NotificationHandler.shared to schedule the notification, which will trigger once after 5 seconds by default.
Please note that we schedule a local notification with the identifier same as the name of the NotificationCenter publisher expected by the onReceive modifier. As our NotificationHandler posts a NotificationCenter publisher event with a name that is the identifier of the received notifications in its UNUserNotificationCenterDelegate methods.
...
VStack {
    Button(action: {
        NotificationHandler.shared.addNotification(
           id : notiName,
           title:"Your Notification" , subtitle: "Have a nice day!")
    }, label : {
        Text("Send Notification")
    })
}
...
...
Hold on! It’s not going to work yet if you tap the button now as we need somewhere in our app to request the permission from the user for sending notifications.
So, we can do it with the onAppear modifier, so it’ll present a prompt to request for permission if it’s not yet granted when the VStack appears.
struct Example1 : View {

    @State private var toShowAlert : Bool = false

    var body : some View {
       ...
       VStack {
         ...
         ...
       }
       .onAppear{
          NotificationHandler.shared.requestPermission( onDeny: {
              self.toShowAlert.toggle()
          })
       }
       ...
    }
}
In the above code, inside the block of onAppear, we invoke the requestPermission() to request for the user’s permission.
The requestPermission() has an optional onDeny block. Inside it, we toggle the @State property toShowAlert, which is needed to present an Alert to prompt the user to go to the device’s settings when notification is disabled.
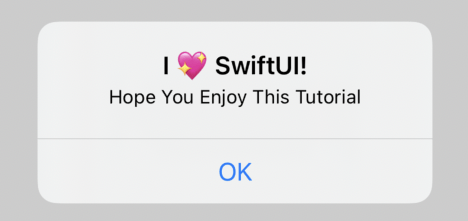
In SwiftUI, the Alert struct is what you need to create an alert. For example, an alert can be simply created with title and message as follows:
Alert(
   title: Text("I \u{1F496} SwiftUI!"),
   message:Text("Hope You Enjoy This Tutorial")
)
And we use the built-in alert modifier of SwiftUI View to present an Alert as follows:
VStack{
   ...
   ...
}
...
.alert(isPresented : $toShowAlert){

     Alert(title: Text("Notification has been disabled for this app"),
     message: Text("Please go to settings to enable it now"),
     primaryButton: .default(Text("Go To Settings")) {
        self.goToSettings()
     },
     secondaryButton: .cancel())
}
...
In the above code, the SwiftUI View alert modifier will present an Alert as soon as the bindable variable toShowAlert is true.
And we create an Alert with a primary button and a secondary button as a cancel button. The cancel button will set the toShowAlert back to false automatically when tapped.
The primary button will invoke our method goToSettings() when tapped.
And the code to lead the users to the device Settings is as below:
extension Example1 {
    private func goToSettings(){
        // must execute in main thread
        DispatchQueue.main.async {

            UIApplication.shared.open(URL(string: UIApplication.openSettingsURLString)!, options: [:],
            completionHandler: nil)
        }
    }
}
The result when it runs on the simulator is as follows.

And when the notification is disabled for the app, it’ll lead the user to the device Settings to enable it, as below :

That’s all for now, hope you enjoy this tutorial! Happy Learning!
One thought on “Handling local notification in SwiftUI”