
Initially, this blog was intended to record some of my game development progresses. But due to some changes in the past couple of months, I’ve now switched to focus more on developing a number of iOS & Android mobile apps that involve several service platforms; as one of my passion projects.
And what I’m doing now needs me to deal a lot with some native mobile app development that involve several programming languages including Swift, Objective C, Java, Kotlin and PHP etc; therefore, I’m thinking having this blog to record what I’ve or I’ll encounter during my spare time of mobile app development works; which will serve as the tips or simple tutorials for my own future reference or may benefit others too.
In most of my mobile app development works, especially on the iOS, I’m more used to adopting the “custom code” method, instead of AutoLayout or using Xib. Therefore, my simple tutorials here will be more based on custom code manner.
I’ve installed Highlight.js on this blog theme, which provides syntax highlighting for several programming languages for easy reading of code.
A quick tip before ending this post
How to generate QR Code by Swift for your iOS app? The top image of this blog post shows you the QR code presented by the Xcode Simulator; when scanned will lead you to this blog’s URL.
Below are the codes in Swift on how you can use CoreImage filter with some settings to generate an UIImage that shows the QR Code to a URL. And you can then add the generated UIImage of the QRCode to an UIImageView and add it to your ViewController
Please note that it generates QR code that is each bit is just one pixel across; thus a scaling up is needed to a respectable size, so it won’t look terrible when stretched inside an UIImageView.
private func genQRCodeImage() -> UIImage?{

        let string = "https://techchee.com/blog"

        let data = string.data(using: String.Encoding.ascii)

        if let filter = CIFilter(name: "CIQRCodeGenerator") {
            filter.setValue(data, forKey: "inputMessage")
            let transform = CGAffineTransform(scaleX: 3, y: 3)

            if let output = filter.outputImage?.transformed(by: transform) {
                return UIImage(ciImage: output)
            }
        }

        return nil
    }
And a function to create an UIImageView which takes an UIImage returned by the above genQRCodeImage function.
private func createQRImageView(){

        let w : CGFloat = 240
        let h : CGFloat = 240

        let x = ( self.view.frame.size.width  - w ) / 2
        let y = ( ( self.view.frame.size.height - h ) / 2 ) - 150


        let f = CGRect(x: x, y: y, width: w, height: h )
        let qrImageView : UIImageView = UIImageView(image: genQRCodeImage()! )
        qrImageView.contentMode = .scaleAspectFit
        qrImageView.frame = f

        view.addSubview( qrImageView )

    }
And in your ViewController viewDidLoad()
override func viewDidLoad() {
        super.viewDidLoad()
        self.createQRImageView()
    }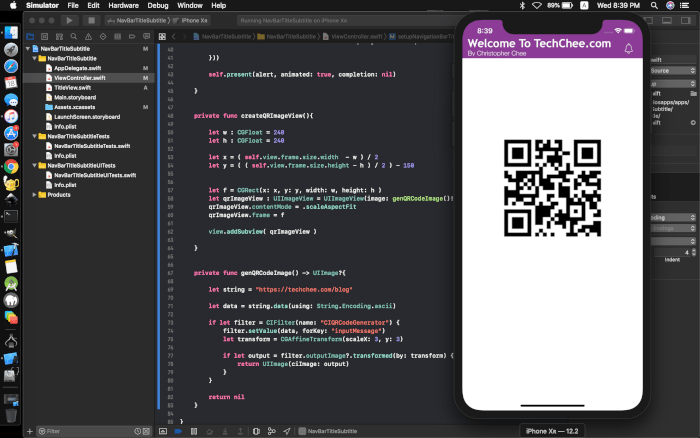
So, when you run it on your Xcode simulator, you’ll get what’s shown above!